Butterfly Magic
By Sue Smyth
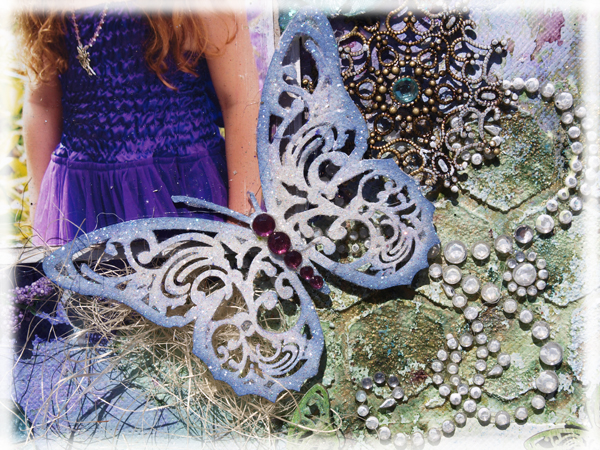
I wanted to make a layout featuring butterflies, using all the different sizes that Imaginarium have. I wanted the butterflies to form the background as well as the fore ground embellishment. So many of us think of chip as an embellishment and not a background element. Here I have used the butterflies and hexagon chip to make the back ground. And also use the butterflies as a mask in areas when spraying with glimmer mist.
It is all about layering inks and mediums and then finally chip to create a wonderfully dimensional background. You may not be able to see this in the photo as it is hard to capture.
Several years ago my daughter posed for these fairy shots, you would not catch her doing that these days. But the photo is perfect for what I wanted to do.
I have used the Croco crackling by Viva for the Magic title, and the background too. I really like the effect. The top right hand side, I have sprayed white dylusions over the top with a stencil and it has been absorbed by the crackle to leave this shadow of a white flourish which I love.
First paint the butterfly with gesso and then ink around the edges with your favourite color, cover carefully with dimensional magic and sprinkle with white glitter. When dry add different sized rhinestones as the body.
Use the hexagon chip as a mask, to apply Viva Stone Effect Paste and allow to dry. Then randomly apply gesso before spraying with purple and olive glimmer mist
Nice detail of the Croco Crackling
Garden Shadow Box
by Sue Smyth
I just love to create pretty things sometimes, and Jane's shadow box is the perfect starting point.
I wanted this to look like a secret garden and I wanted to use just about every way I know to alter chip.
To create the nest I like to use florists wood fibre, simply shape into a nest and spray with mists, dab a little gesso on the top for dimension. The eggs...guess what they are !
They are cotton buds, this is a little secret of mine, so I am sharing here! lol
Dab a little gesso on ends of a cotton bud.
Spray cotton bud ends with turquoise glimmer mist, allow to dry
(or dry with heat gun)
Snip off and adhere with a hot glue gun. If you place them right you cannot see they are not mini little eggs.
The top I have used Aged Taupe Embossing powder by Stampendous. I have trimmed a bracket frame to give more height to the shadow box, and this I have embossed with gold embossing powder,while wet sprinkle with micro beads. When cool, wipe turquoise paint over the beaded areas.
Oh eggshell, one my favourtie ways to alter chip. So save your egg shells, soak them in napi san to clean them, dry and store them in an airtight container for days when you want to craft.
I like to use texture paste to embed the shell, as I find it sticks better. Not to much, but enough to set the shell into.
Step 1
layer eggshell into the texture paste, using a pointed tool to set into the paste. A little at a time. Allow to dry overnight.
Step 2
When dry use a file to take offf any rough edges, you can also carefully snip off overhanging shell.
Then colour the shell with alcohol ink, I have used a mix of black and sandal Adirondack inks.
Coat with Dimensional magic and allow to dry.
To alter the feathers, first I paint them black with either ink or spray paint. Then I use white dylusions inks to splatter little dots over the feather, I also use a white paint pen to add smaller neater dots, and run a line down the spine and sides of the feather. Then add a coat of dimensional magic, and a tiny dusting of white glitter.
For the fern leaves, I used another technique, I have dabbed them with Tim Holtz Crushed olive Distress ink. Then spray with a pearl glimmer mist, either gold or pearl, and while wet shape the leaves and stem so that the fern has an upward sweep. Pinch each leaf for shape. Dry with a heat gun to set in shape.
The vines are done with gesso, Distress inks and utee for that mottled effect. The corner bracket is simply sprayed with black spray paint. I like to use a satin finish.
The title is simply painted with white gesso twice and covered with Dimensional Magic and sprinkled liberally with white glitter. Gesso, ink and glitter are used to create the butterfly the same as in the layout above.


Hope you are inspired and don't forget to leave a comment
on the Imaginarium blog to be in the running for a chipboard prize