Welcome to my Blog

Welcome everyone, I hope to inspire you and share some of my papercraft work. You can find out where I teach and what I am up to, what inspires me and what I am working on next. I love to share new ideas and neat ways of adding creativity to your pages or cards etc

my blog

Monday, February 24, 2014

Couture Creations

Feather Card 
By Sue Smyth 


Those of you who know me, you would know I love birds and feathers.
So of course when Couture Creations came out with 
this feather die, I was in heaven.

I have shared with you how to alter these feathers before in a previous 
post, so today I want to share another. I hope to come
up with lots of ways to alter it, I have not even
started with colour yet !


I have made one feather as per my previous post and now 
here is another way, with very little in the way of materials.


Step 1
Cut feather out of white cardstock and 
light weight chipboard. Adhere the both together.


Step 2
Rub black ink all over the feather. Allow to dry


Step 3
Draw in lines with a gel or paint pen, add spots and detail
as desired.


Couture Creations Used 


Happy Crafting
and don't forget to leave a comment 


Friday, February 21, 2014

Colourful Canvas and Baby Layout

Colourful Canvas and Baby Layout
By Sue Smyth

I am so happy to be continuing on with another year of creativity, chipboard is so versatile, I don't think I will ever lack ideas. So I hope to come up with some fabulous ways
to alter chip to inspire you all again this year.


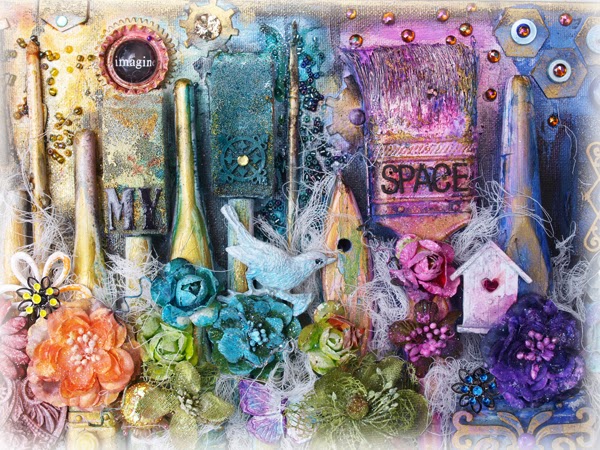
My first project is a colourful canvas inspired by Miranda Edney who created a canvas with old brushes last year. So when I found a whole bucket of stiff old brushes at my father's farm when we were clearing it out
I had to use them. My brushes were a lot nastier than Miranda's were so I had to paint them all with a 
thick coat of white paint. Then I adhered them, along with some old foam brushes
 to my canvas with loads of gel medium and set a side for weeks and weeks. 


So after Christmas, the New year and CHA, I came back to it to make my first 
project for the year. I wanted to make my canvas colourful and include lots of chippie and trinkets.
So I really let my head go.


The result is a little in your face, with colour and flowers, loads of texture and very busy
but that is me, it looks like I have thrown up colour lol


Most of the chipboard is painted with gesso before inking black or I have 
wiped gold paint over the top. I have also adhered a variety of 
chip over the back ground with gel medium 
and they were painted with gesso along coat over the  
brushes too.


To create the rainbow effect I have sprayed Dylusions over the gesso coat starting with warm
red colours and working along to the cool blues and purples. The gesso soaks
up some of the intensity so they mellow nicely into a rainbow effect.


I have then wiped black gesso around the edges and dry brushed in 
between the brushes to make the panel of brushes stand out from the canvas.
Then I have rubbed a layer of gold paint over the brushes and chip.
Lastly I have decorated with trinkets, chip and flowers. If a flower
does not match, of course just spray it with Dylusions and dry off.

This is a great chance to use up all your old embellishments and trinkets
you cannot bear to use, because you want to keep them. And of course old brushes.

I plan on hanging this in my work shop for a colour reference and 
inspiration

Chippie used:


Baby Layout
This is a photo of my daughter barely 1 week old. Of course she is now 13 years old, but it is
always nice to go back and revisit old photos with some of the new
tools and ideas
.

I found this awesome paper in Micheal's in Anaheim, it is lots of small sequins adhered
to cardstock. To tone down the shine, I applied gesso 
over the top. This may seem like sacrilege, but often
sequins and glitter as just too shine!  


Underneath the photo I have bunched muslin into pleats and adhered
a rose at every gather.


A simple red heart is covered in Dimensional Magic and sprinkled
with a little glitter.


On the side I have pleated cardstock and added the Cherry blossom
chipboard 


Chipboard used 


Happy Crafting 
and dont forget to leave a comment
to go in the running for a prize 


Saturday, February 15, 2014

Timepiece 
by Sue Smyth


Come join me at papertrenz.and and make this
old world Vintage triptych, you will be amazed at what 
it is made from.


Learn lots of Mixed Media and recycling skills 
February 23rd 11.00 am at Papertrenz

Happy Crafting

Thursday, February 13, 2014

Couture Creations

Sharing my top four CHA projects 
for Couture Creations 


I love the hand made flowers in this layout, they are so easy to create with Couture Creations
Secret treasures 
and Damask Delight paper pad
This layout appears in The Couture Creations free magazine with full 
instructions. Just see your local stockist of Couture Creations.


Another project I created with Secret Treasures
The rocking horse is such a versatile die, I can see 
that I will be using it lots over the coming year.
I have made a cute reverse canvas for 
a new Mum.
This project is also in the Couture Creations magazine


This project was created for CHA, and again I have made flowers with 
Secret Treasures Retro Flowers | CO723524
And I have also use the Secret Treasures Feather | CO723516
one of my other favourites.
Here I have inked them with black ink, and 
painted spots and lines in with a white gel or paint
pen.  


Here is another layout I created for CHA. it is not often
I get to do a boy layout, as my boys do not let me take 
too many photos, but here is my middle son
on the Endeavour, seems really at home !!

I have used the Couture Creations Madeline collection Lacy 8 | CO723241 
to embellish my layout.
The Lacy 8 I have cut down to insert into the 
top of the layout, never be scared to cut up a die cut
item. Sometimes it can look even
better if only a little piece is peeping out from underneath
a layer. Of course I have used 
Damask Delight paper pad as well

I hope you enjoy these peeks at my CHA work. 
Happy Crafting  

Friday, February 7, 2014

Couture Creations

Heartfelt Banner 
by Sue Smyth


Here is a little piece of eye candy. I love making banners,
 this one you could use for Valentines day or for 
an anniversary 


The large heart panels are cut with Couture Creations 
nesting hearts in white cardstock.


To Make the Banner  
you will need

Couture Creations CO723213 – Nesting Hearts
Couture Creations Kalidescope Heart C0723409
Couture Creations Embossing folder A2 Cheerful CO723282


First Cut large nesting heart from white cardstock 
5 times. Ink the edges with red ink. 


For the rest of the banner, cut red cardstock with the next
size down heart. Emboss with  A2 Cheerful CO723282
Embossing folder.
Rub over with pearl paint and adhere to white


Cut Kaleidoscope heart from
pink glitter paper, back with white 
cardstock and adhere to red heart with 


I have clustered on top of the middle heart
 a lot of old paper flowers, a great
way to use up left over ones. Just spray them the 
colour you want. Dab them with gesso and 
add a chip word.


Tuck in leaves cut from green cardstock with the 
Secret Treasures Aurora Vine | CO723530
Dont be afraid to trim them off so 
you only have small leaflets.
Add bits of muslin and a resin heart


String together with pearls and wide organza ribbon, place eyelets in 
each side of the hearts to thread ribbon through.


and white fibre wrapped around the kaleidoscope heart


Happy Crafting
 and 
dont forget to leave a comment 


Tuesday, February 4, 2014

Couture Creations


Just Dreamin Layout 
by Sue Smyth 


My Daughter just loves to day dream, and here she is on our friends boat, who know's 
what she is thinking...


I just love the Secret Treasures feather die, and here I have combined it with real feathers to 
embellishment my layout. I have several ways I like to alter the feathers and 
today I will share one of them below.


You can easily use Couture Creations Rhinestones to make rows 
of bling to embellish


Couture Creations used
Damask Delight paper pad 


Step 1
Cut feather die from white cardstock and
light weight chipboard. Adhere both together.


Step 2
Use a fine tip pen to doodle in lines over the feather.


Step 3
Spray with water to blend the pen 


Step 4
Allow to dry naturally to enable the pen
to bleed. Blend a little with your finger if needed.

Handy Hint 
Use a white gel or paint pen to add spots or highlights.

Happy Crafting 
and don't forget to leave a comment