Welcome to my Blog

Welcome everyone, I hope to inspire you and share some of my papercraft work. You can find out where I teach and what I am up to, what inspires me and what I am working on next. I love to share new ideas and neat ways of adding creativity to your pages or cards etc

my blog

Tuesday, February 23, 2016

Couture Creations 2


Magnolia Lane Butterfly Explosion Box
by Sue Smyth 


One of the things I like doing the most is 
explosion boxes, and when you design
your own papers one of the perks is
you can design papers and images that 
will suit your favorite types of projects.
So here is one I had in mind all the time
when designing Magnolia Lane ..hope you like it 


I have used a label die to cut the four sides of the box
you can then simply score and fold the labels
and attach to any size square you like to form the base.


The decorated top, has my take on a 
sugared Magnolia.
See step by steps below to make this.
I have used the beautiful Resin corners too 
with their lovely pearly sheen.


I have then used the panels from Magnolia 
Lane Poetical Labels to decorate the inside of the box.


The cheeky butterfly is roughly cut out
then adhered to white cardstock with a 
glue stick. Then I fussy cut and adhere it
to a toothpick.
You can also cover the wings in 
dimensional magic and sprinkle with 
white glitter for a sparkly look.


Sugared Magnolia

1. Spray the center of the flower with a soft pink mist.
2. Dry off with heat gun.
3. Spray with adhesive and dip into white glitter.
4. Remove the outer petals to make the flower smaller.


Products used


 Happy Crafting 


Sunday, February 21, 2016

Imaginarium Post


Things with Wings Frame 
and Wishing Well book
By Sue Smyth


This year so far I seem to be in a bug phase, at the 
beginning of the year I found a silver cicada ring,(which
I bought) and I loved it so much I looked for 
a plastic one to craft with.
I found lots of tubes and packets with assorted
plastic bugs which inspired me to this framed 
specimen board.


I have layered Imaginarium chipboard butterflies with 
dragonfly's and solid butterflies. 
to create a mythical layered flying machine. 


I have then topped it with a painted bug.
With a wide selection to choose from in 
the bag of bugs, I have chosen here a dragon fly.


Each panel is different. 
To achieve the pearlescent look, I
have sprayed the chipboard with
matt black spray paint and allowed it to dry.


Then I have layered over metallic gold paint, and 
assorted colours of metallic Inka gold.
I have also use some of the Stemple farbe for  
a glittery look to some of the wings.
You can mix contrasting colours for a really
neat look that pops.


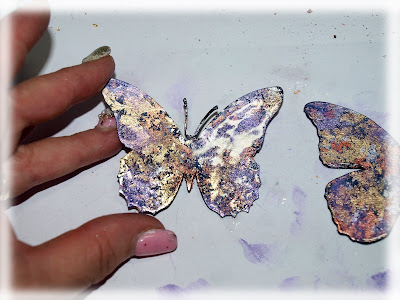
This little creature is a chipboard butterfly that
I have added Mega Flakes to, you can
just follow the instructions below to 
create a gorgeous opal look like this.


I tried a plain black frame first and while 
it was ok, the white frame above looked so 
much better.


Step 1
Paint chipboard butterfly black with
Matt black spray paint and 
allow to dry.


Step 2
Rub over flitter glue,this is a sticky size
that will dry tacky and help
the gilding flakes adhere.
You can fudge this with ordinary glue,
but the flitter glue is better.


Step 3
Level the glue out with your fingers, so it will
dry evenly.


Step 4 
Place Mega flakes randomly over top of glue, when it 
is dry.


Step 5
Tap down the flakes so that they 
cover most of the black chipboard.


Step 6
Then use a scouch pad, (plastic scourer)
to remove excess gold flake,to reveal 
the gilded wings below.


Step 7
I have added a little purple inka gold
to the edges of the wings to
Match with the other 
creatures I have made


Step 8
Cover surface with a thin coat of dimensional magic 
to seal the surface and give a wonderful shine.


Here are some close ups of each creature I have made


The larger middle butterfly sits in a gilded frame.
This, I have gold embossed twice for a lustrous effect.


The dragon fly has black opal seed beads
adhered to his body for dimension.
I have used Dimensional magic to 
affix the beads as it dries glossy and clear.


I have added in some metal charms too, for 
smaller and shiny layers.


Each creature sits on a chipboard panel
I have created with Magnolia Lane papers and stamps.


This butterfly has a Magnolia Lane die cut
in the middle for a touch of realism 


Each bug is sprayed with matt black spray paint
too. And when dry rub over gold metallic paint first,
as a base.
Allow to dry and then dab or blend
contrasting colours of inka gold.
It picks up all of the texture.


Dont forget to decorate the centres, I have used a rhinestone
and silver bugle bead here.

Chipboard used 


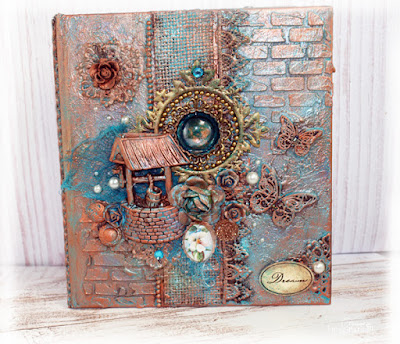
Wishing Well Address book

This practical little book is made from 
a purchased address book from a supermarket.


This project is a little more simpler than the last
but still pretty.


I have used texture paste, lace and braid to 
alter the surface of the book.
Then added trinkets, chipboard and resin shapes in a 
cluster to decorate my cover.
Everything gets painted with gesso and painted 
with Calypso Teal Dylusions paint. 


I have double embossed the frame, and while 
hot, spray with Calypso teal Dylusions, continue
to heat for a second or two and then allow to cool.
this gives a wonderful antiqued look.


When you are happy with your book, rub over
copper and turquoise inka gold for 
a burnished patina.

Imaginarium Chipboard Used


Happy Crafting 


Thursday, February 4, 2016

couture Creations 1

Altered Book
by Sue Smyth 


Hi Bloggers
Today I am sharing another of my CHA projects.
I love an altered book, they can be so much fun to make 
and are a great decorator statement.
You can also make them useful by 
altering inside to form a journal.
Or like I do sometimes I cut all of 
the pages out and turn the inside
into a box. So I can then store things in it. 


I have altered the flowers, but wicking
you simply need to wet the paper 
flower first before dipping into
spray of your choice, this way the 
ink seeps up the petals for a softer look.
Or Magnolia Lane paper flowers are perfect for this.
Then I like to spray them with adhesive and sprinkle
with white glitter...


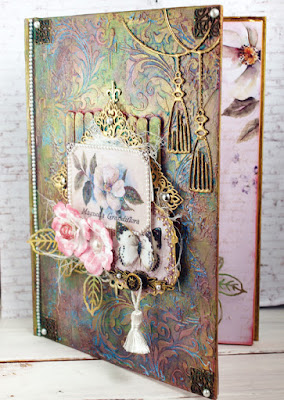
I have trimmed out the Magnolia Grandiflora panel
and adhered it to scrap cardstock for stability.
Then cover with Dimensional magic for 
shine and strength, and sprinkle the smallest 
amount of white glitter over top for a faint sparkle. 


I have used the gorgeous tassel die, I love this one most I think.
Cut the die from scrap cardstock or even old cereal boxes. Did you
know our dies will cut light weight chipboard?
Then, I have double embossed with gold embossing powder for
a rich full look.


Here I have die cut the leaves form green cardstock 
and then dry brushed with white gesso.
Then rub over gold paint for a neat gilded look.


Inside the book I have, glued all of the pages
together by painting the edges of the pages 
with gel medium. Then paint over 
gold paint to hide the gel medium.
I have left the front pages as is, to decorate 
with Magnolia lane papers 


Here you can see the tassel die in action again
this time I have die cut them in white cardstock.
I have covered them with Dimensional magic and 
dipped into white glitter for a classic look.
The leaves this time I have blended a 
little Victorian Velvet ink over the ends 
for a burnished look.


The Finished book!
Oh how to do the cover, well that is a whole nother post, coming 
later!


Products Used 


Happy Crafting !