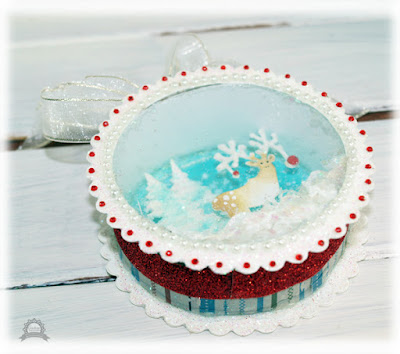
Christmas Pringle Ornament
By Sue Smyth
Ahh Christmas time, my favourite time of year.
I love making little hand made ornaments and gifts
and the humble pringle tin is a great place to start.
As you know I have used just a little before lol.
Of course I have made a little snowy scene in the middle
Couture Creations Christmas dies.
Add a pearl brad and lots of soft white ribbon to hang
your ornament and everyone who receives this
will be filled with the joy of the season.
Here is a little step by step for you to follow
Step 1
Cut down a pringle tin, I use a small hacksaw and trim
up with Couture Creations scissors
Step 2
Cover the outside and inside of the tube with
double sided tape.
Step 3
Trim patterned paper for outside to 3 cm, and
plain white cardstock for the inside to 3 cm.
Carefully adhere them both to the cylinder.
Step 4
Die cut 2 medium scalloped circles from
white cardstock.
Recut the second scalloped circle with a smaller
nested circle die to create a frame.
Next cover with dimensional magic and
drench with white glitter.
Step 5
Use the cylinder to cut a circle from acetate. I find
that scoring on the acetate with the Couture Creations
pointed tool works a treat to create a guide for cutting.
Step 6
Die cut Reindeer twice from white cardstock.
Snip off one of the deer from both and glue together.
Step 7
Dab a small amount of brown ink to the rump of the deer.
Add dots of white ink or liquid paper over the brown ink.
Also add 2 mm and 4 mm red rhinestones to the baubles
hanging from the antlers.
Draw in eyes etc.
Step 8
Adhere pringle tin to the scalloped circle
with hot glue to hold in place.
Step 9.
Add a continuous line of PVA glue to to the outside
and inside of cylinder to fill
in any gaps, and avoid any glitter escaping from the ornament later.
Step 10
Scrunch up a tissue and adhere to bottom of ornament.
Paint the sky with a little blue or turquoise spray ink.
Add a few flicks of white ink for snow.
Step 11
Adhere a row of small pearls to the inside of
the scalloped frame, and add 2 mm red
rhinestones to the edge of the scallops.
Step 12
Build a scene inside the ornament, add glittery trees. to
the background and place the deer in the front.
Secure in place with hot glue.
You can add a spoonful of white glitter and
mica shards to the snow, to form a
shaker ornament.
Adhere acetate top to ornament, again
use PVA glue to seal the edges.
Step 13
Adhere the decorated top over the acetate, and check
for any glitter leaks.
Add a strip of glittery washi tape or ribbon around
the outer edge, insert a pearl brad into it first.
Then tie a piece of organza ribbon around the brad
to hang the ornament
Couture Creations Materials
Happy Crafting.


Sue this idea is so creative and very pretty. I'm amazed of how cute it is. Gosh you are fabulous and talented.
ReplyDeleteThank you for sharing this sweet idea.
Hugs from Monica...spain