Mermaid Canister and Happy Ever After Layout
By Sue Smyth
One of my favourite themes is the mermaid, and when thinking what will I do this
year,, my hand reached to a black canister box. At first I was not
certain what I was going to do with it other than
put the lovely doily chipboard on the top
But as I worked on, a treasure box to hold a Mermaid's treasures
was what I came up with. A gift box.
This one of my favourite ways of working, whether it
is a 6 x 6 canvas or a note book. The layering of textured paper
paper towel, plasterers tape, masking tape or tissue paper as a base
and layering over the top selected chipboard.
Start with an ordinary box, this time the box is black
which is important for the final look.
If you don't have one, simply spray an old
MDF box with black spray paint.
Sand the box, so that the gel medium has a good
surface to bond too.
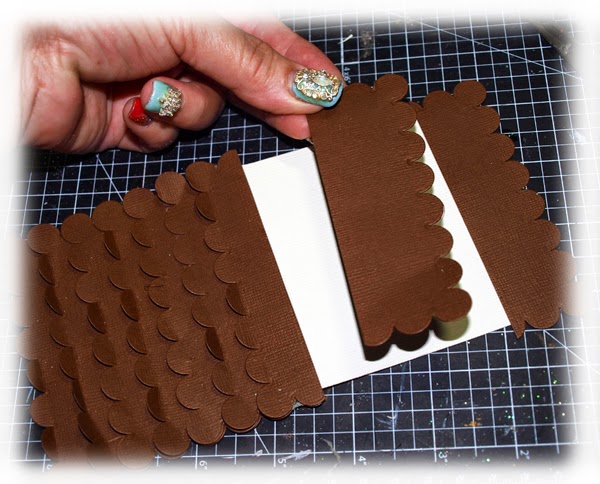
Adhere chipboard and assorted buttons, beads and trinkets
with gel medium or texture paste.
I have used a rubber band to keep the border
in place while it bonds to the canister.
Snip away when dry.
For the lid I have added a little texture paste
and carved wavy lines in the paste, to
represent waves.
When dry, brush with gesso with a dry brush
and allow to dry.
I love this look as it is!
To skip ahead and I have sprayed with a selection of
dylusions and glimmer mists.
I like to mix the two and often
use 4 to 6 colours to get the look I am after.
I have also added things as I worked. Just dry brush
with gesso and spray with inks too, then add with
gel medium or glue.
The mermaid is a home made mold, made from a
chunky necklace, put into a mold making medium and
now I can make as many as I need.
I have made the resin mermaid quite thin so
it bends to the side of the box.
Handy Hint
Often when you heat a resin item it will become
pliable, so you can bend it to it the box.
Also I like to apply dimensional magic over
seed beads to give a really good bond. This is best to let
set for a good while,
When you are happy with the colours, burnish with
gold paint. I have also used a pearlised purple too.
Handy Hint
To burnish, use any good quality metallic paint, I like paint
because is it more fluid than inka gold or rub on pastes.
Rub over raised areas with an extremely light touch, use middle
finger and apply like you might apply blusher to your cheek.
Do not be heavy!!
I have trimmed the end off a Prima bead and hot
glued it to the top. To hide the
glue I have wrapped a tiny piece of
fibre around it.
The other side I have made a bit darker with
the sprays, like deeper water.
Add loads and loads of rhinestones in sea colours
around the sides of the canister.
A great time to use up odd and ends
Handy Hint
Adhere rhinestones with a little gel glue as the
adhesive on the back will not
be strong enough over time and use.
Fill with a selection of shells and wish stones
for some lucky young lady (or old lady lol)
Chipboard supplies
My next project is a Disney layout, I have made
a pact to do more US layouts this year.
I have been to Disneyland 3 times and have not
scrapbooked one single photo. I think because
I don't like the traditional cheesy Disney stickers
and images that it has put me off.
I have started by creating a laced element
along the side of the layout
This is simply done, punch matching holes on either
side of torn pieces of cardstock.
Then punch small holes from some scrap cardstock, layer over a larger
circle and punch to create a hole reinforcment.
Adhere over the layout holes, for a lacing element.
Paint clouds with a thin coat of gesso, allow to dry.
Then coat with a thick coat of gesso and
dry with heat gun, This will blister ad bubble.
When dry, coat with Pearlized Medium
Coat cardstock with a thickish coat of gesso, then
stamp background stamps into gesso.
The stamp will actually remove areas of gesso
leaving the design etched into the gesso. Allow to dry.
Spray with mists and inks as desired.
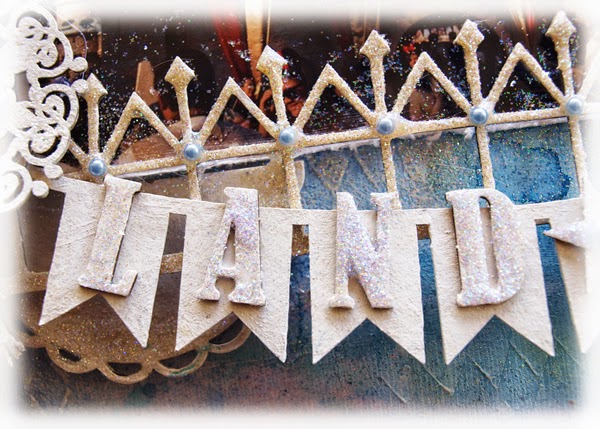
For the rest of the layout, I have painted the chipboard with white gesso
and either coated with dimensional magic and 3 neutral shades of glitter. or
given a coated of pearlized medium.
Some neat details for you to see.
Don't be scared to layer up your chipboard for a
finished dimensional look.
Add some fibres for a softer look, this is important
when using so much chipboard which has
sharp linear edges.
Use glitter as a medium, I have coated the feather with
white glitter, then added a strip down the middle for
a beige glitter. This is subtle use of glitter as a kind of paint rather
than just for sparkle.
I love using graded colours of glitter to create an
ombre look. Just coat the area you want darker
with Dimensional magic, sprinkle with glitter
then move on and coat the next layer.
chipboard supplies
Happy Crafting
And don't forget to leave a comment to
go in the draw for an Imaginarum prize pack