Welcome to my Blog

Welcome everyone, I hope to inspire you and share some of my papercraft work. You can find out where I teach and what I am up to, what inspires me and what I am working on next. I love to share new ideas and neat ways of adding creativity to your pages or cards etc

my blog

Saturday, December 28, 2013

Glittered Christmas Greeting card

Glittered Christmas Greeting Card 


Today I have created a Christmas cards with Couture Creations 5 x 7 embossing folder  C0723597

This matches some of the images in the Couture Creations Vintage Christmas paper pad C0723551
So I have combined both to create a card with dimension 


Emboss Kraft cardstock with Christmas Carols embossing folder 
and gently rub over red ink


Dry brush edges with gesso.
Then rub with Inka Gold red metallic paste.
Adhere to a 5 x 7 red cardstock card

Trim out matching image from Vintage Christmas pack.
Use a crackle stamp to create crackle and swipe over with Dimensional magic, allow to dry 
Matt with red cardstock 
Adhere to card front with 3 D foam tape.
Decorate as desired with bakers twine and punched leaves and 
Couture creations gems 

Handy Hint use a white paint pen to fill in detail in images and faux stitching 

Lastly spray the entire card lightly with a paper varnish and sprinkle over white glitter. For
a glittery sparkle.

Happy Crafting and Merry Christmas 


Wednesday, December 11, 2013

Couture Creations Christmas Daily

Christmas Daily 
By Sue Smyth 

With the Christmas season upon us, it is a really nice thing to record our
 daily preparations, memories of the past and traditions that we have each and ever year.

If you are like me and time poor, make the cover of this mixed media book up
in advance and just slip the pages in as needed when you do them.

I have made this sturdy mixed media book from an old Readers Digest book.
Add lots of glimmer mists and glitter along with a few bits n pieces 
in my stash.

Materials 

Couture Creations Fantasia Doily Dies Ivy Set  C0723222

Couture Creations Vintage Christmas Paper Pad C0723551

Couture Creations Craft Knife C0721987

Couture Creations 5 x 7 Embossing folder A Magical Time Wrapped in Joy C0723588

Couture Creations - 5x7 Embossing Folders - Moonlit Berries Wrapped in Joy C0723596

Couture Creations  Intricutz Sophia Collection - Connexion C0723506

Couture Creations Nesting Dies Roses C0723218

How to make the cover 


Simply use Couture Creations Craft Knife to remove the inside from the cover of book 


Layer over hand towel and adhere down with gel medium, allow to dry.  
Emboss cream cardstock with  Moonlight berries folder and adhere to cover.
Cut Ivy set doilies from kraft cardstock and adhere to cover as pictured.


Paint with Gesso and allow to dry  


Spray with glimmer mists, and use an alcohol pen to colour the berries on the Moonlit berries folder.


Rub gold paint over the raised areas.


Emboss white cardstock with A magical time embossing folder, trim out the greeting 
you desire and adhere to cover with 3 D foam tape.
Rub over red ink and gold paint.
Spray with spray lacquer and sprinkle with coarse white glitter 


Create a flower
Step 1
Cut 2 of 3 sizes with the Roses die from red cardstock, 
pierce a hole in the centre of each.
Snip around the edges to create petals.
Step 2
Gather together several stamens and glue together.
thread through the holes of the flower starting from the smallest 
to the largest.
Step 3
  Spray with water and scrunch up to create a flower. 
Dry off to hold in shape.
Spray with adhesive and sprinkle with glitter.
Step 4
Adhere to cover along with assorted bits and pieces. Rub 
extra elements with gold paint.

Cut Connexion die from green cardstock, spray 
with adhesive and sprinkle with glitter.
attach around the rose flower.

For the Inside 
Trim assorted cardstock to make a folded page that fits the inside of your book.
Create as many pages as you think you will need.
Dry brush gesso over the edges.

Tie bakers twine around the fold of each page. Align the knots
to the bottom of the fold. 

Punch a hole into the spine of the book with a Crop-a-dile and 
thread  organza ribbon through the hole and 
through each strand of bakers twine and back through the hole so both ends
come through the hole.

Handy Hint set and eyelet over the hole to make it sturdy


Tie the ribbon into a bow on the outside of the spine.
This way you can add more pages as needed.

Use Couture Creations Vintage Christmas Paper Pad to 
Decorate as desired with the ordinary and traditional things you do
each Christmas 


Happy Crafting & Merry Christmas 


Tuesday, December 3, 2013

Christmas Dome


Christmas Dome 
by Sue Smyth 

A family heirloom 
I only have one project for you this month, but I think you
will agree it has lots to interest you. 


This is a special project,that started back in June when 
I saw Jane's Dome at the
Brisbane Scrapbook and Paper craft Expo.
  I quickly saw a Christmas version in my head and just
had to do it.

Then I had to wait until Graphic 45 released their 12 days of Christmas papers.
 and with a little help from a friend, I grabbed some as early as 
I could, to get started.

Next I had to find the time, there are 8 sections to this dome, and I wanted 
to decorate each one with a different Christmas theme. So
I sat down with a pencil and sketched up each
of the rooms with the ideas I had in my head.

Next, print off lots of photos, small, large and medium (of course I have loads left over too)
and then to allocate them to the themed rooms I
had planned.


A little video of how it all works, sorry for the quality, but the best we 
could do at the time.


The glass and the dome all sit on a MDF box with turning table.
 All quite sturdy and 
so suitable for decorating. 

So here are some shots of the dome with out the glass
 so you can see 
the detail better
this is Christmas Past and Christmas Caroling

this is Santa's workshop and Baby's first Christmas
On to The land of sweets and A White Christmas.

The last is the Nutcracker and The Night Before Christmas 

Many of the elements I have saved away for years..
This is the Night before Christmas, all I need now
is a tiny little mouse. 

The Nutcracker
The Ballerina sits on a spring so she dances as the turn table 
moves around. You can just see it on the video.
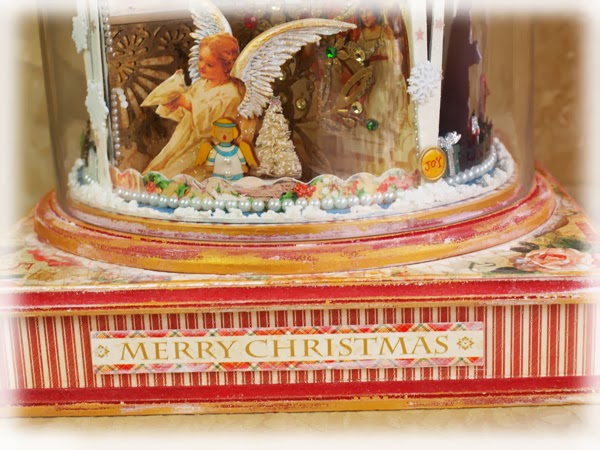
Christmas Caroling 
Prima resin wings give the Graphic 45 Angel true dimension
I have strengthened all the papers with white card.
then fussy cut them. I am actually in that photo, many 
many many years ago, but you can hardly see me.
But I know I am there lol


This is my nieces and nephews, who are fully grown now and Christmas of the past,
 and peeking
through the door are my children as Christmas of the future 
Baby's first Christmas, say no more lol

Santa's Workshop, small people at work.

The land of Sweets, every year we do a candy table, so colourful
sweets are one of my kids favourite things.

And a White Christmas, complete with a North Pole, made from a 
drinking straw, white glitter and a sparkly bead. Of course
Tim Holtz Idea-olgy Woodland Trees fit beatutifully

Side on view

Another side on view.

 Chip board used 
Dome Kit ( contact Seriously Scrapbooking for a kit)
Graphic 45 12 days of Christmas and Nutcracker patterned papers
Snowflake punches and Martha Stewart picket fence punch
pearls, dimensional magic 
Glitter, gesso, white cardstock and lots of trinkets 
And lots of Imaginarium Chipboard
I am going to list as many as I can but 
If I miss some I am sorry there are so many. 


Hope you are inspired to make your
own family Heirloom.

And happy crafting
please leave a comment to go in the draw
for an Imaginarium prize!

Friday, November 22, 2013

Couture Creations Christmas Card 2


Red Robin Glittered Christmas Card 


Today I am sharing a sweet little card made with Couture Creations Vintage Christmas paper pad 

Cut out a small A 5 card and trim off one edge with a punch
Emboss Kraft cardstock with Moonlit Berries Wrapped in Joy C0723596
Dry brush with gesso and allow to dry.
Ink with green ink and paint in the berries with a cotton bud and Inka Gold red metallic paint
Adhere to card front. 


Cut Scallop Circle from white cardstock with
and then the reverse of the robin paper from the pack with
fussy cut robin and place over scallop and circle as pictured.
finally apply a red bow along with  
and
as pictured 

Handy Hint if you love glitter like I do, lastly spray the entire card lightly with a paper 
varnish and sprinkle with white glitter. This is a really great way to hide any mistakes lol.


Happy Crafting & Merry Christmas  

Tuesday, November 12, 2013

Couture Creations Christmas Layout

Christmas Kids
|By Sue Smyth 


This Christmas layout is a little different using Hot pink, teal and white as a color theme.
Couture Creations Jolly Christmas Paper pack has loads of papers suitable for this 
color theme.
I little trick here is if you do not have a photo to suit these colours, simply
have your Christmas photo printed in Black and White or Sepia as I have done.

Couture Creations Pink Blush pearls sit inside paper flowers nicely

Cut out circles from patterned paper, ink the edges and follow the steps below to
create cute baubles. 

Glittered Chip Letters
Step 1
Ink chipboard alphas with a color of your choice

Step 2
apply Dimensional Magic over the surface of the inked alphas

Step 3
sprinkle with a little white glitter

Step 4 
allow to  dry before affixing to your layout

Snowy Baubles 


Apply White dimensional paint to the tops of baubles.

Sprinkle with white glitter and allow to dry.


Couture Creations Products 
Couture Creations 12 x 12 paper Pad Jolly Christmas 
Thanks for stopping by and 
Happy Crafting