Welcome to my Blog

Welcome everyone, I hope to inspire you and share some of my papercraft work. You can find out where I teach and what I am up to, what inspires me and what I am working on next. I love to share new ideas and neat ways of adding creativity to your pages or cards etc

my blog

Monday, September 30, 2013

Sneak Peek

Here is a Sneak Peek at a 
Christmas Class I am doing at Paper Trenz 

Join me to make these gorgeous Angels from the Prima Mixed Media Doll stamps and 
recycle pringle tins and ribbons spools 

I think this one is my favourite, and thank you to the ladies 
in Sunday's class who inspired me to
get a move on and make these yesterday lol
Contact Paper Trenz to join me in the class 

Thursday, September 26, 2013

Mixed Media Album

Mixed Media Album
by Sue Smyth

A while ago I created this mixed media album from Kaszazz products. They have a gorgeous range of metal and resin products new out. What I like about this project is that you always end up with something different every time you make one of these creative albums. I love to make them as unique presents or gifts.

To create the base I have simply covered the 8 x 8 chipboard pages with any patterned paper, see below. The usual way with mitered corners. Adhere to the chipboard with Glue and seal.


Then use the Bricks stencil and gesso to create texture, along with lace, masking tape and scraps of cardstock.


Once all has dried, paint roughly with gesso, and dry. Then spray with your choice of 3 dylusions. Using more than 1 color gives great depth and interest. The gesso base, absorbs some of the strong colour to give you a variation in the strength of your colours.
Arrange all your elements in a cluster on the cover, glue down with Glue and seal, dry off with heat gun.
Paint gesso over all elements roughly. Take care not to dislodge any elements.

Add a title, you can paint the chip title with gesso and then spray with dylusions. Allow to dry and coat with Glossy accents. This will activate the intensity of the dylusions again, for a bolder colour.
Rub gold paint along the bottom.

Swipe around the edges with Black gesso.
To finish rub Adirondack gold paint over the raised areas to bring up the detail and add a touch of luxury and shine.

Add pearls and bling and bind with a Cinch from We are Memory Keepers.


Covers before painting with gesso and spraying 

Back cover, use scraps and tape to create texture.


Tuesday, September 17, 2013

Cherish the memories layout

Cherish the memories Layout 
by Sue Smyth 

Here is a Dusty layout of my daughter, this is my favourite photo of her, I took it many years ago when she was about five, I love rose in her hat, and have used the colours in the hat for my layout.

I have started with a base of texture paste and added two chippie branches and a stencil, once dry, coat the lot with gesso to form a great base for Glimmer mist sprays 


To create the mottled effect on the vine flourish, first paint it with gesso, when dry dab with crushed olive and peeled paint Distress stains.  Allow to dry and cover with dimensional magic. The trick is to swirl around the dimensional magic and scrape the distress stain with the tip of the nozzle.  So when it dries you have this swirled effect.

Dusty flowers are sprayed with glimmer mist, then a small amount of spray adhesive, sprinkle a little white glitter and you have jazzed up your flowers.


The fern leaves I have just barely swiped with gesso and used them as is, this is a great contrast to the heavily altered chip. 

The little bird houses are simply painted with gesso, coloured with Copic makers and covered in Dimensional Magic. The little mushrooms are painted with gesso, red ink is applied to the tops, and I have used a white paint pen to mark out the spots, cover with dimensional magic to seal. 

To make the faux opal, fill a trinket finding with black enamel accents, carefully place chips of glitter and mica shards into the enamel accents. Allow to dry, and cover with Dimensional magic. I love this effect and use it all the time with different colours and glitter glues.


Enjoy some close ups 


Dusty Attic Products used 
Corner Scroll #4Branch #1Branch #2VIne Corner #2mini Butterflies #2Flutterbies #3Window with Shutters large
Toadstools


Hope you are inspired and Happy Crafting 
Sue Smyth

Wednesday, September 11, 2013

Heart Easel card

Heart Easel Card
by Sue Smyth


The new Sophie Berardi Die is just perfect for an Easel card, the intricate design needs little to embellish it.


Couture Creations Products 
Couture Creations Berardi Die C0723492
Couture Creations Cheerful embossing folder C072382

Couture Creations Scalloped Rectangle C0723047

Couture Creations Glitzin Glamour hot pink C0721974


Other Products 
Pink ribbon
Victorian Velvet, Ranger Tim Holtz Distress Inks
White and pink cardstock
white glitter
dimensional magic
large pearls
with Love Stamp
Black ink


Thanks again for joining me hope you were inspired and catch you next time 


Saturday, September 7, 2013


A Sneak peek
Here is a sneak peek at the layout I am teaching in October in Noosa 
join me for a 

3-day scrapbooking retreat at Ivory Palms Resort, Noosaville 4-7 October (Labour Day long weekend).
Price is $399 which includes all meals (except breakfast), accommodation in 3BR Townhouses, very generous goodie bag which includes two challenge packs, your class & Kit, heaps of scrapping time and lots of laughs.  Prizes and giveaways galore.
2-day option also available.  For more information, check the website www.qldscrapbookingretreats.com.au or call Ann on 0413 21 6096.


See you there for a wonderful weekend of Scrapping fun 

Friday, September 6, 2013

Dusty Attic


Altered Journal 
By Sue Smyth
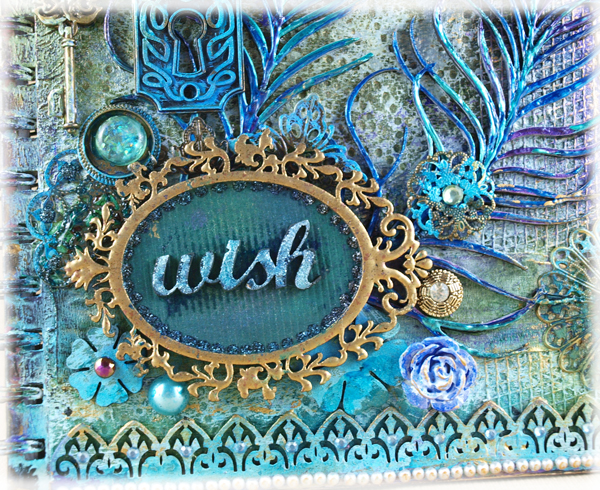
Today I am sharing an altered journal, made with a Dusty Attic notebook and chipboard. This is one of my favourite projects to do, and with chipboard it is very easy to achieve texture an dimension. I love the colours and gentle curves of peacock feathers. So I just had to create a journal featuring The Dusty Attic peacock chip feathers.

I have used Liquid pearls to colour the feathers as I like the raised surface they give.
There is an illusion of curves to the surface just like the real feathers. 
The iridescence is awesome. You could also use lumiere paints and Dimensional Magic.


Around the golden frame I have clustered assorted buttons, resin shapes and metal trinkets.
You can raid your stash to see what you have.
Anything that has a flat backed is suitable to be adhered to the front
with a thick wad of Gel medium, use it like you would icing.

Some nice close ups of the Gold frame, I have embossed the oval frame with Stampendous Aged Gold embossing powder. 

To speed up drying time use your heat gun, this will even dry gel medium.
May be not thoroughly, but enough to handle the book while working on the 
next step. 

When you have painted the peacock feathers flip them over and spray with black Dylusions to cover the whit gesso that shows on the sides. 


Take one Dusty Attic Journal 
To prepare the journal, I have used Gel medium to adhere assorted paper towels to the cover. Each brand has a different texture and pattern. so I like to mix it up. Adding masking tape to the edges gives it extra strength. I have also added plasterers tape and of course some Dusty attic chipboard. 
Once the gel medium is touch dry coat the whole book randomly with gesso.
Dry with heat gun.
Spray randomly with glimmer mists as desired.

Step 1
Coat feather in white gesso and allow to dry. Start with peacock liquid pearls and cover some of the fronds of the feather

Step 2
Add other colours to the feather, majestic purple and royal blue liquid pearls.

Keep the nozzle clean and unclogged, and
 add layers of colours until you build up a thick surface. Don't be afraid of 
adding more colours over the top of the previous.


Materials 
assorted paper hand towel
Gel Medium
brushes
mesh tape
masking tape
white and black gesso 
heat gun
fully purple, mallard and olive glimmer mist
Assorted metal trinkets, buttons and resin shapes
Peacock, Majestic purple and Royal Blue Liquid pearls
metallic gold and purple paint
pearl strip
Black dylusions( to spray the back of peacock feathers)
Gunmetal stickles
Stampendous Aged Gold embossing powder
Dusty Attic chipboard
peacock feathers 
oval frame
border and corner 
lock
chip flowers
wish 

Corner Scroll #4

ATC Frame #1


mini keyhole 20 pk

Corner Scroll #4