The Giant Mummy Book
and Pigs might fly
By Sue Smyth
I love searching second hand stores for nicely shaped books
and a few months ago I found this massive
Atlas, with a super hard cover. It cost me the huge
price of $1.00 ...what a bargin
It measures about 60 x 30 cms so yes it is large
and heavy.
I knew exactly what I wanted to do with it, I love
Egyptian art works, and with Halloween
coming up, I knew I would be able to find
lots of Mummy inspired items, along
with my favourite go to plastic bugs !!!
YEAH
Here are some super close ups, here
you can see how I have created a giant
rip in the front of the book.
And I have burnt the edges of the paper.
I use a fire lighter to make it easier.
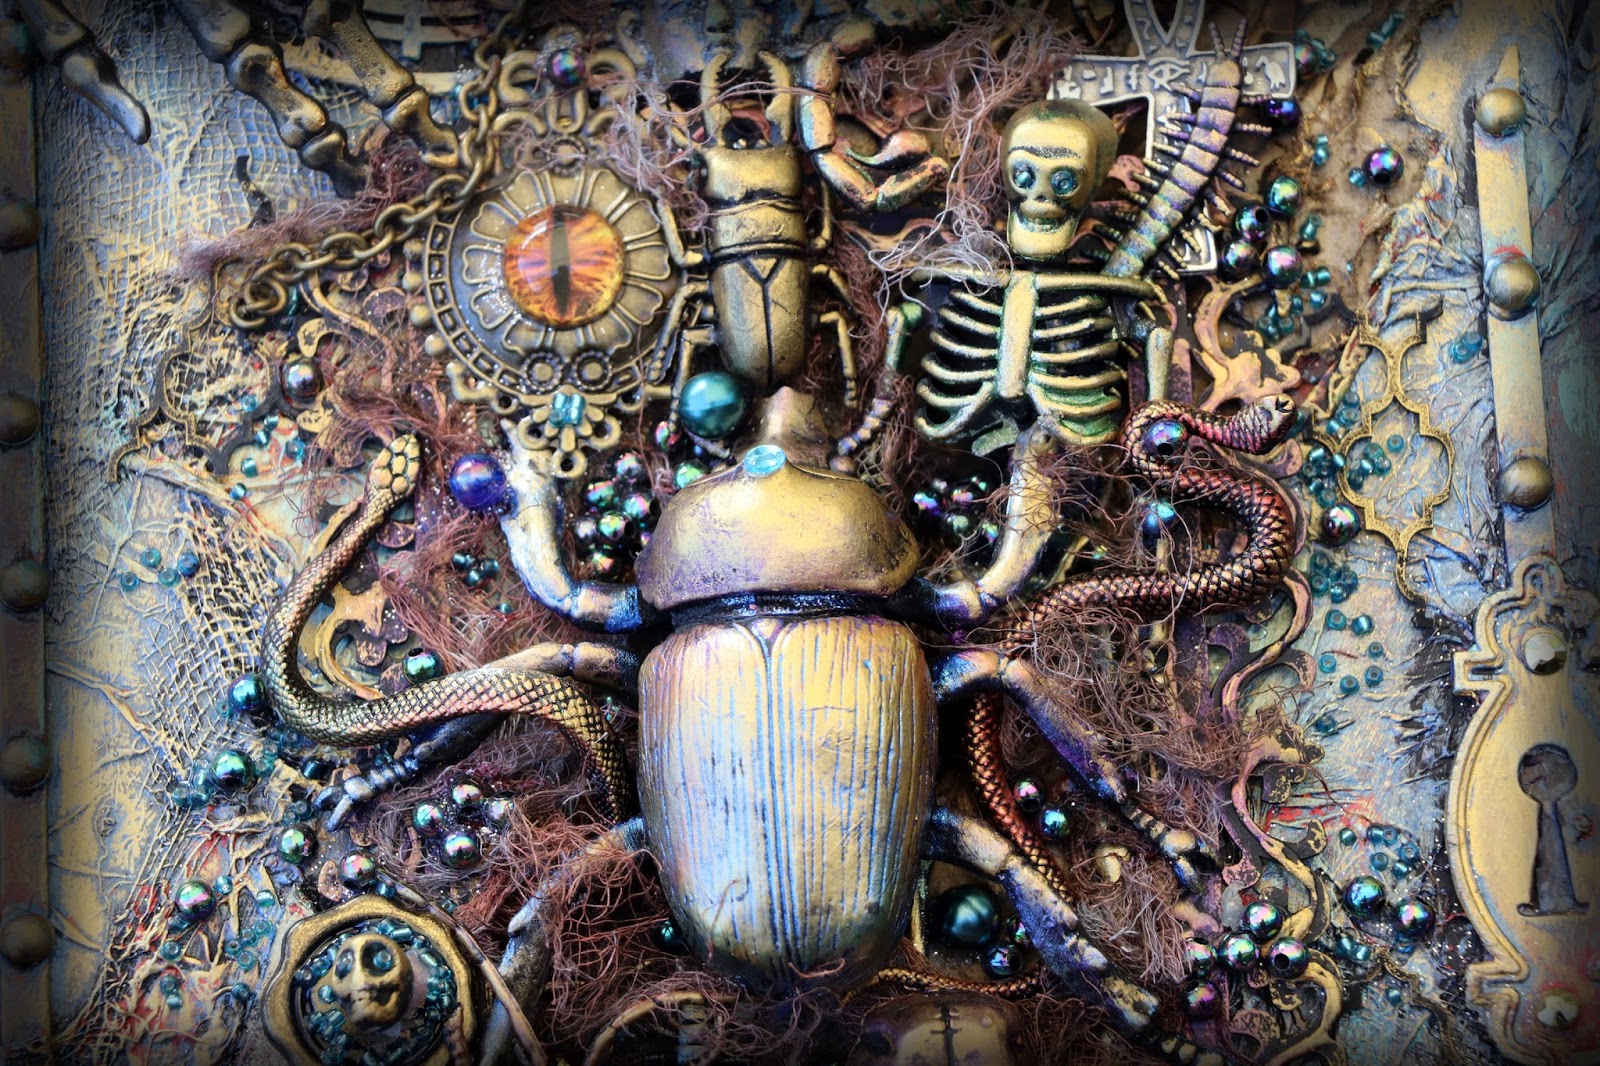
Here is my giant Scarab, I found
it as the Australian Geographic shop,
you can get a whole pack of assorted bugs for about$15.00
Here I have included plastic snakes and
a plastic skeleton, you will find these
at any store selling Halloween decorations.
I found lots of plastic skulls at Spotlight
and they work a treat when painted
with black gesso and then layered
over with metallic paint.
I also found some super Dragon eyes that just
had to be included.
I needed an ANKH, which I found online
to tuck into the mix.
Along with a Scorpion.
I tried to use bugs that
were relevant, like centipedes, scarabs, beetles
and scorpions, things you would find in the
desert.
To soften the look and hide
any voids, I have dyed
some muslin brown
and teased it out, I have tucked that in
all over the front.
The best thing I found was
these skeleton hands again
at Spotlight in the Halloween
section, they were the inspiration for the whole
book, I wanted 2 skeletal hands
to appear to be ripping the
book apart, and the melee of
bugs to be cascading out.
I also made some resin molds
of King Tut to include.
This plastic scarab is huge, I did have
to alter him a bit to make him more
authentic, a bit of surgery
with the scissors turned an elephant beetle
into a scarab.
I have called my book Secret of the Tomb.
I am working on the inside too, but it
was not ready in time, so
I will post it next blog post.
I have adhered lots of gauze to the cover to
appear like a Mummy shroud.
Here is a little Hint on how to do it
The cover has been cut in half with a CHAINSAW,
yes that is right,the cover was so hard I had
to enlist hubby and his trusty
chainsaw, I made sure he did
it roughly for a rustic look.
I have added macrame cord around
the edges and layered over
it scrunched tissue, and on
top of that, chipboard and embellishments.
Burn the edges with a bbq lighter or a portable
burner from a kitchen shop.
Then paint the whole book with
black gesso. It is starting
to look so cool already!!
The frame is painted with black gesso.
Then randomly draw with
liquid pearls(any colour)
Then leave it to dry.
When dry paint with black gesso again, and dry off.
When you rub over gold ink gold it will
pick up the fine lines and looks so
vintage.
The main body of the book
is covered in crumpled tissue
painted black and then
rub over inka gold of your choice, I have
used Graphite and cobalt.
I have also used an Art Alchemy wax
Here is the start of my embellishments, and as you can see above
I kept filling the frame with
whatever I wanted to enhance the theme.
Why not have a go and make you very
own altered book.
Pigs Might Fly
My next project is a cutie.
I have been looking for so long for a fat cute
pig to alter. And at last I found one.
She has several layers of wings and such a cute
smile on her face.
I had to make her a crown, and I found
plastic ones in the party section.
To decorate the sides I have adhered chipboard
cogs, to the base of the pig, and layered over
real metal ones later.
Even her bottom is cute lol.
Cheese !!
Paint the crown with black gesso first
and then rub over with gold inka
you will be surprised at the detail
that is revealed.
The monarch butterfly chipboard makes a great set
of wings for a pig.
Here is a little how too
First paint the pig black, I use
flat black spray paint, but you could
also use black gesso.
Then add texture paste to
the surface so you can adhere the chipboard.
It helps to mist the chipboard with water
first so it can bend with the
shape of the object.
When dry, paint black again
this time with black gesso,
as this will help the colours adhere
to the surface.
Then paint the pig turquoise and add
a little purple paint.
I have done this randomly
as I love the randomness of ART.
Chipboard is sprayed black too, and
sponge over paint randomly.
I have rubbed over Alchemy waxes, this
one is Antique Turquoise.
It gives a cool aged look.
The add Vintage gold for a super sheen.
Happy Crafting