Welcome to my Blog

Welcome everyone, I hope to inspire you and share some of my papercraft work. You can find out where I teach and what I am up to, what inspires me and what I am working on next. I love to share new ideas and neat ways of adding creativity to your pages or cards etc

my blog

Tuesday, July 23, 2013

Sweet Smile layout by Sue Smyth

Sweet Smile by Sue Smyth 
This month I am sharing a girly layout, using Couture Creations dies and embossing folders of course. The Faux opal on the right I have shown you before on a card. This is how you can use it on a layout I have cut an oval from thin chipboard that fits a resin frame, proceed with the ink and Glitz n Glamour as usual and cover with Dimensional magic to create a gorgeous faux opal for your frame.

The flowers are made with Couture Creations Roses dies, the larger bloom I have shown you before, but I thought I would share how I do Sugared Roses.


Step 1 
Cut out the largest shape from the Roses die from white cardstock


Step 2
Trim off edge about 1 cm in width
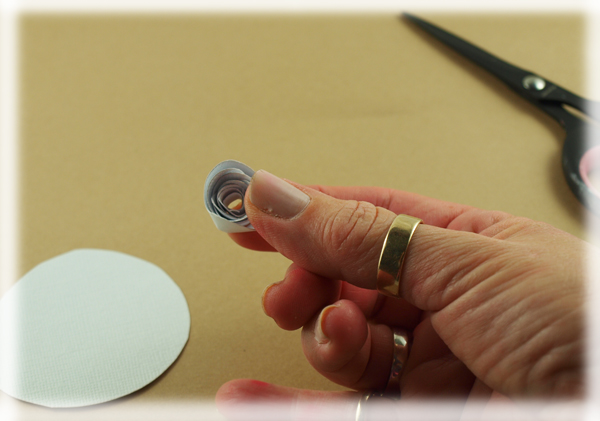

Step 3 
Roll up the spiral with a flower roller or bamboo skewer.


Step 4
Release and allow to unwind a little.


Step 5
Glue to the scrap white card with Hot glue. 


Step 6 
Trim off the excess white card.


Step 7
Use Couture Creations Tweezers to roll the petals.


Step 8 
Spritz with your choice of spray inks. Allow to dry or heat gun


Step 9
Spray with spray adhesive.


Step 10
Dip into a pot of white Glitter.


Step 11
Voila! one sugared rose. This works best on pale colours rather than dark and looks just like sugared violets  do


Handy Hint when spraying with mist, cover all of the flower and then apply just a little of a darker colour to the centre only.
to add a kind of dimension. You can do this with a paint brush or pipette. 

Materials 
Couture Creations Roses Die C0723218
Couture Creations Poetry Embossing folder 
C0723218
Couture Creations tranquillity C0723435
Couture Creations Scalloped Rectangle CO723047

Other Materials 

ZVA creative pearl flourish crb-05cA-138
Martha Stewart Doily border punch
Martha Stewart Branch punch
Carta Bella Beautiful moments Damask paper 
White Cardstock
White Glitter
Gesso 
Pink Cadillac & Olive Glimmer Mist
Lace 
Dusty Attic chip flourish
Crushed Olive Ranger Tim Holtz Distress Paint
Lace and ribbon
Imaginarium Alphabet chip


Thanks for Sharing hope I have inspired you to create.

Friday, July 12, 2013

Something extra


Different version of Trinket Box


So if you want to do another version of the Trinket Box with Couture Creations Irish Dreams die, here is an example. This time I have used Dimensional Magic to apply white glitter to the Irish Dreams shape. I have also cut out a pink piece of cardstock to place under the intricate design. Like the metal box below, I have made a top and bottom to create a neat box for any little gift ..

Monday, July 8, 2013

Irish Dreams Trinket box


Hello Every one 


Today I am going to show you how to make this gorgeous little trinket box, you can give as a gift or just keep yourself, using Irish Dreams die. Believe it or not I woke up one Sunday morning with this in my head, I have a metal trinket box very similar to this and while waking up, had an ah ha moment, the Irish Dreams die  shape was the same, so maybe I can make a cardstock trinket box. And the answer is yes I can.


Couture Creations Materials 
Irish dreams C0723224
Cabaret Embossing folder C0723163
Couture Creations pearls 

Other Materials
Black cardstock 
Silver embossing powder
versamark
paper flower 
gesso 
Pomegranate Glimmer mist 
Handmade Halo trinket
Stampendous aged Silver embossing powder
light weight chipboard
glitter


Cut chipboard with the Irish Dreams die twice, you may have to roll through your machine several times to get it to cut well. Or just cut 2 with ordinary cardstock and glue together for strength. Remove all the excess with Couture Creations Tool. 


Coat both chipboard shapes with versamark and apply embossing powder, heat set in the usual way. Once cool rub over black ink, and wipe off with a wet hand towel.

Cut out base pattern, with Couture creations teflon scissors, use double sided tape to construct the box base from Black cardstock 

Box base 

Box lid, the lid is slightly larger than the base.

Emboss black cardstock with cabaret folder, cut strips first and place were the best part of the pattern is.
Rub over versamark and sprinkle with fine silver embossing powder, heat set in the usual way. Adhere all strips to the sides of the box lid.

Adhere one of the embossed chip shapes to the lid and one to the base. Use strong glue and put a weight on it to make a good bond.

Check to see if lid fits over the base and decorate with a metal trinket, some paper leaves and a paper rose.

I have painted the rose with gesso and spritzed with Pomegranate Glimmer mist. Once dry, spray with a little adhesive and sprinkle with a little white glitter. Add pearls as accents, to help the lid adhere to the box, insert 4 silver brads in each corner.  


Wednesday, July 3, 2013

Altered Clock and Cherish layout

Hello everyone
Today I am sharing a sweet little layout and Altered clock 

This is a photo of my daughter some time ago with her new guitar, she was so happy to have this as a Christmas present. I love the red colour in her top, so I wanted to play on that and leave more white space than I usually do.


To create the butterfly I have painted it with Fired Brick Tim Holtz Distress Paint, then I have dabbed a little gesso over the tips of the wings, and allow it to dry. Spray with adhesive and sprinkle with a little white glitter. 


To alter the vine, I have painted with two coats of Gesso, then applied dimensional magic, and sprinkled with Donna Salazar's pralines and cream glitter. Dimensional magic or glossy accents, capture the glitter much better than just ordinary glue you dont have so much glitter loss.

For the embellishment 8 I simply embossed with aged gold embossing powder for a rich golden shine to match the ribbon and love tag.

Imaginarium Chipboard 


Other Materials 
Donna Salazar Pralines and Cream glitter
Prima Jodie Lee Fairy Rhymes paper Papillion
Fired brick Ranger Tim Holtz Distress paint
Brown Cardstock
Musical washi paper
gold embossing powder
petaloo flowers
Bo Bunny red flower
TCD strip of pearls
gesso
white glitter
Prima Stencil 
Tea Dye Ranger Tim Holtz Distress Ink
brads
Dew drops
muslin
ribbon
pearls
Turquoise Glimmer mist 


An Altered Clock 

I had purchased a cheap clock from Kmart with the intention of altering it, it did not work for long and I was going to return it when I figured I did not want it to work, so I could decorate the surface more. The roman numbers were already there, along with the script. But I did add plasterer's mesh, crackle mesh  and crackle medium, along with micro beads for texture. Then I have wiped randomly with black gesso and white gesso, then spritzed with Marmalade and Mallard Glimmer mist. When dry I have sprayed a Gloss varnish over the lot to give it shine and make it tough !
Then I just had to decorate and add my favourite photo of my 3 kids and their Uncle.   

You can see I have matted my photo on the cogs waste and clustered flowers, trinkets and chip to form a large cluster below the photo.

You might not notice the Branches and leaves chip below, what I have done with this is spray with Olive Glimmer mist and while wet peel the top layer of each leaf, dry off and then you will have a  more dimensional element. 


I love Imaginarium feathers, this time I have painted the feathers with Brushed Corduroy Ranger Tim Holtz Distress paint, then coated in Dimensional magic and dusted with brown Glitter.
The peacock feather I have painted with Mallard Silk metallic paint, then I have drawn blue and green liquid pearls over the fine ends to give a ridged look. The middle I have coated with lots of turquoise stickles and a rhinestone.

The Bracket I have embossed with aged gold embossing powder, and cut an oval of paper to fit. I have taken a small version of the same bracket, coated it in black ink and dimensional magic. Then I cut the ends off to form mini brackets, to glue over the top of the gold element. Add a rhinestone and resin heart which I have painted with gesso and then sprayed with Cross your Heart glimmer mist and highlighted with gold paint to form a bracket cluster.

To colour the Sharing the good times, I have simply painted with Antique linen Ranger Tim Holtz Distress paint, two good coats to give it matt colour. Then while still a little wet sprinkle with Gold embossing powder and heat. Dont sprinkle too much, just a little for an accent.
I have embossed the clock hands with aged gold powder and while hot, sprinkle with micro beads, I have sprayed with White linen dylusions ink and flicked black ink over the hands while hot too.

Imaginarium Chipboard


Other Materials 
Old clock face
Gold embossing powder 
Blue & green liquid pearls
Mallard Silks paint 
Marmalade,Olive, Mallard and Turquoise Glimmer mist
Black & white gesso 
crackle medium 
Plasterers tape
Crackle mesh
micro beads
brown glitter
Assorted Couture Creations Flowers
petaloo flowers
Handmade Halo trinkets
old buttons
black ink
gold paint
Spray varnish
rhinestones and gems 
Antique Linen Ranger Tim Holtz Distress paint 


Really hope that you enjoyed my projects! 
Please leave me a comment for a chance to win some adorable Imaginarium Designs chipboard! :)