Altered Book, Fairyland Folly and
Spotted Mushroom Layout
By Sue Smyth
I recently went to New Zealand on a teaching cruise. We went
on lots of shore excursions and the one I loved the most was
to the Weta Workshops. You may know this as
the place that made all of the props for Lord of the Rings and the Hobbit
among other things.
I found some large plastic Weta's and when I got back was
inspired to make yet another altered book, featuring the
wonderfully creepy Weta and elements from the lord of the rings.
Enjoy the images of the book and dont forget to go to the
end of the post for a step by step tutorial on how to
get the same textured cover.
In my stash I had a dragon and a
few trinket swords, but I tucked an Imaginarium
chipboard sword underneath them too.
The Castle turrets are just a plastic toy from
Kmart, spray paint it with matt black spray paint and you
are good to go with metallic paints.
See how I make the deeply textured spine below.
I have included lots of buttons, beads and trinkets.
I have painted the sides of the book with Gel medium
with a stiff bristle brush to adhere all the pages
together, this is a neat short cut!!
Here is the back, I have kept it plain, so I can see the
wonderful texture of the tissue and rope...see below on how to.
My next project is a little folly, I am not really sure what to call it lol
I had a small chunk of wood left over from the wood chopping
one winter, it was so textured and gnarly that I kept it for some day!!
I have been playing with a 2 pack moss paint system from
plaid, so I started with that on the bark. then I added
some real moss.
In my stash, I had some small mini mushrooms and tiny tiny
flowers so I perched them on top of the wood.
When I finished I placed it all on an Imaginarium
chipboard doily and added more moss around
the edges.
See how realistic the moss is!! The really funny thing is
I made this before I left for NZ, and by coincidence
I saw lots of red and white mushrooms while there
so went on a photo hunt for the perfect shot of a red and white mushroom
So I had to make a layout to feature all of my photos of mushrooms
I decided to be dramatic and use black as the base of my layout.
But I also wanted a woodsy feel to the layout, so I have included
twigs flowers and leaves.
The Caper White butterfly from Rambling Rose was the perfect\
foil for the red of the mushrooms.
In the background I have printed descriptions and photos of
old books and the text about mushrooms
I have added small green prills around the background
for a more organic look
Add some white paint splots too!
I have roughly stamped text on the black background with
white gesso and a Rambling Rose script clear stamp.
Some wild looking daisies and small flowers seemed the perfect
match to finish the layout.
Here are some steps, the background, spray painted chipboard
and the two part moss paint.
Step by step book cover
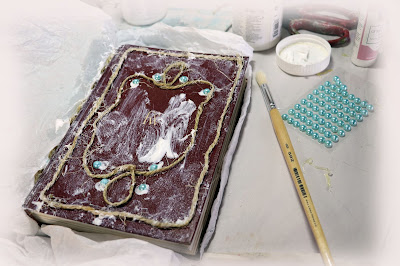
Adhere thick rope or string onto the cover of an old book
with a hot glue gun.
Next apply gel medium all over the cover, add in
a few pearls if you want even more texture.
Now carefully layer over scrunched tissue paper,
using a bristle brush to tap it into place around the
rope.
Do not worry if it tears a little it will be
right in the end.
Now paint with black gesso, make sure
to get into every nook and cranny.
Add some corners and paint with black gesso.
I have added a few micro beads too for added texture.
Remember texture equals detail.
After I have embossed the frame with aged silver
emboss powder from Stampendous, I have added
a few gold micro beads while it was hot.
Now to add colour, I have dry brushed it
with After Midnight Dylusions paint.
Then with a fan brush apply Inka gold graphite
all over the surface.
Then rub in some turquoise inka gold.
Add other colours as desired.
I have also added some Lindys Magicals, all over the surface.
Keep adding colour until you are happy with it, I started out
wanting a very silver look and then turned more towards
a copper organic look
Happy Crafting


