Welcome to my Blog

Welcome everyone, I hope to inspire you and share some of my papercraft work. You can find out where I teach and what I am up to, what inspires me and what I am working on next. I love to share new ideas and neat ways of adding creativity to your pages or cards etc

my blog

Wednesday, November 25, 2015

couture Creations 2

Christmas Pringle Ornament
By Sue Smyth

Ahh Christmas time, my favourite time of year.
I love making little hand made ornaments and gifts
and the humble pringle tin is a great place to start.
As you know I have used just a little before lol.

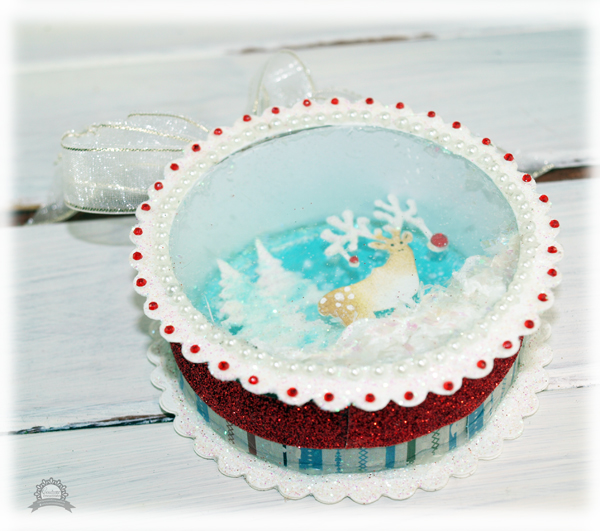
Of course I have made a little snowy scene in the middle 
Couture Creations Christmas dies.

Add a pearl brad and lots of soft white ribbon to hang
your ornament and everyone who receives this
will be filled with the joy of the season.

Here is a little step by step for you to follow 


Step 1
Cut down a pringle tin, I use a small hacksaw and trim
up with Couture Creations scissors 


Step 2
Cover the outside and inside of the tube with
double sided tape.


Step 3
Trim patterned paper for outside to 3 cm, and
plain white cardstock for the inside to 3 cm.
Carefully adhere them both to the cylinder.


Step 4
Die cut 2 medium scalloped circles from
white cardstock.
Recut the second scalloped circle with a smaller 
nested circle die to create a frame.
Next cover with dimensional magic and 
drench with white glitter. 


Step 5
Use the cylinder to cut a circle from acetate. I find
that scoring on the acetate with the Couture Creations
pointed tool works a treat to create a guide for cutting.


Step 6
Die cut Reindeer twice from white cardstock.
Snip off one of the deer from both and glue together.


Step 7
Dab a small amount of brown ink to the rump of the deer.
Add dots of white ink or liquid paper over the brown ink.
Also add 2 mm and 4 mm red rhinestones to the baubles
hanging from the antlers.
Draw in eyes etc.


Step 8
Adhere pringle tin to the scalloped circle
with hot glue to hold in place.


Step 9.
Add a continuous line of PVA glue to to the outside
 and inside of cylinder to fill 
in any gaps, and avoid any glitter escaping from the ornament later.


Step 10
Scrunch up a tissue and adhere to bottom of ornament.
Paint the sky with a little blue or turquoise spray ink.
Add a few flicks of white ink for snow.


Step 11
Adhere a row of small pearls to the inside of 
the scalloped frame, and add 2 mm red 
rhinestones to the edge of the scallops.


Step 12
Build a scene inside the ornament, add glittery trees. to 
the background and place the deer in the front. 
Secure in place with hot glue. 
You can add a spoonful of white glitter and 
mica shards to the snow, to form a 
shaker ornament.
Adhere acetate top to ornament, again
use PVA glue to seal the edges.


Step 13
Adhere the decorated top over the acetate, and check
for any glitter leaks.
Add a strip of glittery washi tape or ribbon around
the outer edge, insert a pearl brad into it first.
Then tie a piece of organza ribbon around the brad 
to hang the ornament


Couture Creations Materials 


Happy Crafting.


Saturday, November 21, 2015

imaginarium

Christmas layout and 
Baby Boy mini canvas 
by Sue Smyth 

You may have noticed a tutorial earlier this year on how
to make a paling fence effect.
Here is a layout using the same effect but different colours.
This time I included a bright green, to team with a Christmas 
layout.


I have embossed the tree with gold embossing powder and added 
micro beads, see the little tutorial below.
To make it look larger I have cut it in half and placed
above and below the photo

I have added lots of Christmas red flowers,
to give them depth and shine, I have painted
the petals with red inka gold, added red glitter glue 
to the centres and also dipped 
the very edges of the petals into red dylusions.
This gives a really need dark edge to the petal.


Last year I found these really neat glittered foam balls,
they are just perfect for adding to layouts etc, as they
are light weight and flexible.

I simply painted the chip children with 2 coats of gesso, 
and dried off with the heat gun for a bubbled effect 


For the presents, I have painted with gesso and dried.
Then add dimensional magic and white glitter.
Allow to dry and then add red glitter glue for 
the ribbons and bow.


And I have simply painted the small ornament with
white gesso and tucked under the flower cluster.


This is the first 2 layers of the paling fence, using lemon and green paint
with petroleum jelly in between for the stripped
back  effect ...
to refresh yourself with the step by step check out
this link


For the gold tree, first I have embossed with
2 layers of aged gold embossing powder.


Sprinkle with gold micro beads while hot.


While hot spray with white dylusions, and continue
to heat for about 5 seconds, until the surfaces
fractures and bubbles and the white dylusions are dry.

Imaginarium Chipboard


Delightful Baby Boy 
Mini Canvas 


I made this little canvas for a friend who is expecting a little
baby boy, she can use this to decorate the nursery. Because
it is small it can easily tuck away when it is 
out grown.


The train is painted white and gently inked on the edges.
Then cover with a layer of dimensional 
magic and white glitter.


The sun is painted yellow, then cover with a layer of 
dimensional magic and sprinkle over
yellow flocking and a little yellow glitter.


The clouds have many layers of thick gesso painted over them
dry and blister in between each layer for a fluffy effect.

Imaginarium Chipboard


Happy Crafting All 


Tuesday, November 10, 2015

Couture Creations 1

Little Artist Layout
by Sue Smyth 

Hi Bloggers
we don't always think of using dies for mixed media, but 
I love using my dies to cut out light weight chipboard
and using them for texture in a mixed media piece.
The arty look suits my photo of DD who even at a 
young age would fill sketch book after sketch book
with drawings, and still does. 

Adhere die cut mini doilies all over cardstock and when dry
paint with gesso.
Spray with your favourite coloured sprays and dry again.


Wipe the raised areas with gold metallic paint to highlight 
the texture.

Add a few details, like sequins and beads, with some 
splots of ink for a painted effect.


When the glue was wet, I have added a light
sprinkle of micro beads for extra texture.


To make the cheery orange flowers, die cut several sizes
with Layered flowers dies, arrange in order of
size and fasten with a brad.


1. Then dry brush with gesso, allow to dry.
2. Then spritz with water and scrunch up, dry off again
3. Then spray with colour, scrunch and dry again.
4. Lastly spray with adhesive glue and sprinkle with white glitter 

Couture Creations Materials list 


Happy Crafting