
Golden Galleon Box
and Fairy notes book
by Sue Smyth

Hi bloggers
this month I have been inspired by my recent cruise
with Needlework tours
Jane Tregenza and I and lots of other super talented tutors,
taught on the high seas.
So I created a Golden Galleon box,
When I am out shopping in cheap shops or second hand
stores, if I see something interesting I buy it, sometimes I
have an idea what I will use it for, other times not.
This time I knew exactly what I would do with a cute
plastic ship.

This project started with a small plastic ship, that I instantly
thought.,, that would look great gilded.
A friend gave me a Graphic 45 black album box and
the project took shape.
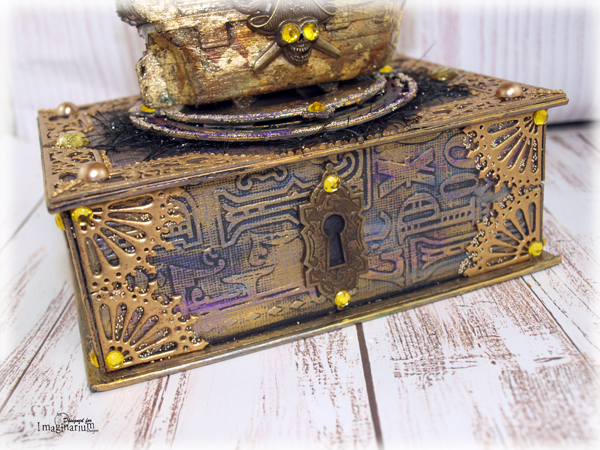
The next component was from me, my Magnolia Lane Typography
embossing folder. I knew it would look fabulous in black and
rubbed over with metallic paints.

So then I added lots of Imaginarium chipboard, embossed with
Stampendous Aged gold embossing powder, twice.
I now emboss everything twice as it gives a larger
than life lustrous look.

The ship is sprayed with matt black spray paint.
Then dry brush with gold paint to enhance the details.
I have added Mega Flakes to the hull of the ship for added
detail and gold sheen.

For the spine I have cut up a border and double embossed.
Trim the ends so that they fit snugly and form a
rectangular panel on the spine.

The compass is sprayed with matt black too, and then
covered with Mega flakes and finally a coat
of dimensional magic. See below for a step by step.

I have added gold micro beads to the edges of both
compasses for added texture.

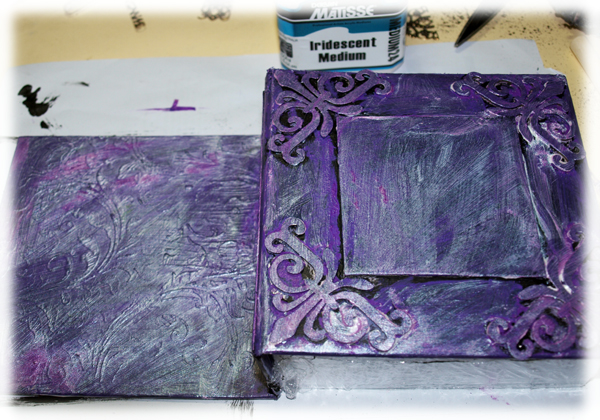
Step 1
The base of the box is simply, black cardstock embossed
with Magnolia Lane typography embossing folder,
Trim to fit the sides of the box and adhere
in place with gel medium.

Cover all sides,

Step 2
Then rub over with inka gold paints, purple, blue, graphite and lastly
gold paint. Have fun with this, keep adding colour until you
are happy with the look.
.

Step 3
Double emboss all of the corners and chipboard.
You will notice I had to snip a little of these corners
to make them fit. Always look for ways
you can modify something to fit in with your
end plan.

Step 4
Now the compass, spray with matt black paint and
dry.

Add flitter glue and dry, then the mega flakes.

Use a scourer to remove and distribute the
flakes for an out of this world aged gold look,

The large compass, spray with matt black too, but this
time just rub over with gold paint for a simpler
look.
Assemble all of the pieces on top of your box to finish.
Chipboard used


Fairy Notes

My next project was a great find in a second hand store,
You will see below how hideous this was before I attacked it,
It is a super useful note book, complete with pen and
tear off papers. I love that the edges of the paper are
metallic silver already.

I have used chipboard to form the corners and snipped
up trinkets to surround a wreath of flowers and berries.

In the middle is a gilded toy doll, converted into a fairy with
double wings.

Tucked into the wreath are flowers, berries bunnies, and butterflies
just like a woodland scene.

I have decorated the spine with chipboard too and
lots of large bling and pearls.

To colour the metal butterfly, just rub over
with turquoise and purple inka gold.
Add dimensional magic and iridescent beads to the
center of the butterfly

The addition of metallic paint to the chipboard makes it seem
like metal,

Of course the book opens too to reveal a generous
paper pad to take lots of fairy notes on.

Ok here is the original! I love cats as much
as anybody, in fact I have 3 ,,,but this
is not the type of note book I would
rush to buy, except when it costs
just $2.00 and it can be altered,

To start my project, I have roughly
mapped out what I want to do and
checked each piece will fit.

Then I have wrapped the inside in glad wrap to
protect it from paints and sprays

Add the chipboard elements by using
gel medium as a glue,
Gel medium has much more
flex than regular glues and
allows bending and flexing in books and boxes.

Then paint with black gesso, and dry.
Layer over a coat of Dylusions purple paint, using a
dry brush for a random look.
Paint over Matisse Iridescent medium, to give a layer
of metallic and shine.

Then add inka gold metallic paints.
I have used green, purple, turquoise and of course gold paint.

Add trimmed trinkets and a small line of
glue, sprinkle over green flaky glitter. shards

Double emboss frame and adhere to the centre of
the top of box.

Spray, matt black spray paint over plastic doll
and dry, then rub over with the same
metallic paints
Emboss large monarch butterfly, after you
have sprayed it with matt spray paint;
Rub over with metallic paints too, add to the centre.
Twist branches and dodo vine to form a wreath
and adhere around the fairy,
tuck in flowers and berries, bunny brads
butterflies and anything woodsy.
Chipboard Used


I just thought I would share what my table ( my freezer top)
looks like when I am working, a mess right,
But that is the creative process, and when
I am finished the job of tidying up lol


