Welcome to my Blog

Welcome everyone, I hope to inspire you and share some of my papercraft work. You can find out where I teach and what I am up to, what inspires me and what I am working on next. I love to share new ideas and neat ways of adding creativity to your pages or cards etc

my blog

Tuesday, February 21, 2017

tiny treasures by sue smyth


Tiny Treasures
By Sue Smyth 


Hi bloggers
This time on the blog I am sharing a few small things.
My workshop is overflowing with lots of projects
so this year I am looking  at small projects, very small, as I
simply dont have the room for bigger projects.
So my first treasure is a tin, decorated with an eggshell
heart..I have called it " Be still my beating heart"!


The Styrofoam heart is covered with texture paste and 
then cleaned egg shell is set into it. I have 
added micro beads around the base and 
once dry I have then painted it with 
red paint and rubbed over with gold.


I have then altered an arrow, and I loved this effect so much I have done
more of them, that I will share with you below.


The trinket crown is adorned with tiny 
3mm or 2mm rhinestones and pearls.
When you are working small 
the thing to remember is the details matter.


Inside I have made a simple mini album, which
I have not filled with photos yet but will in time.


Under the heart is an ID Wendy 
frame that is embossed with Aged Gold 
embossing powder and spritzed with 
black dylusions while hot, for 
an even more aged look.


This is what the heart looked like raw.
You can see the eggshell is broken into
pieces to press into the texture paste.
It is a bit fiddly but worth the effort.
Then add the micro beads around the 
bottom to hide any rough edges.


More Arrow fun, I loved doing the wrapped arrow above
so much, I made more.
this one has a trinket butterfly on the flight.
and I have wrapped the shaft with red wire.
The head of the arrow is wrapped in gold metal shim
and then hammered to look aged. Rub 
a little black gesso over it to 
stick in the crevices. 


A large red jewel finishes the tip, along 
with a tiny crown and of course lots of 
2mm rhinestones.


The butterfly has more 2mm rhinestones and 
gold micro beads to add interest and texture.


He is another arrow, I have added a small 
metal arrow to the shaft, after
I have wrapped it with red 
cotton.


I have wrapped the head of the arrow the same as 
above, but this time added small details
and a large trinket corner underneath.
The flight has a metal skeleton leaf, which
I have cut up to resemble metal spikes.


These arrows can be a feature on another project (like the 
tin above) or even a pin or brooch. They are 
just a bit of fun to do and yes they dont
take up much room.


Here you can see what I have done with the 
arrow, first paint black.
then cover as much as you can with
metal shim, wire and rhinestones, 
with the goal being that you can no 
longer tell it is just chipboard.


The next little treasures are tags. Again this is 
a small project. I was cleaning out
my beading boxes and came
across lots of lovely small beads in the shape
of flowers, leaves and butterflies. 
I thought what a shame I do not use them more.


So I shifted them over to the scrapbooking section 
and now use them on all sorts of projects.


This tag uses the tiny ID bird cage,
it is simply embossed in aged gold 
so it looks just like a gold trinket itself.
I have added a tiny bracket frame and 
words too.


Here I have enameled the butterfly wings, I will 
have to share this in more detail in another post.
as I forgot to take photos for you all.(I get involved and forget lol)
I use a thick metallic paint and pearl drops to 
make a swirly pattern and then let dry.


The bead leaves look like green glass 
and  give a great detail and
shine to the tag.

Here I have added another small detail
the resin rose, which  I have made myself
with 2 part resin.


The tag base is simply painted black 
and then covered with old book pages, 
which have been trimmed with deckle scissors
and inked to add an aged look.


This is a great base to start layering 
tiny elements onto.

Happy Crafting !

Saturday, February 18, 2017

flash back friday 4

Flash back Friday 

Here is another project from 2013, for Imaginarium Designs
I have used purple here as my theme to 
match the dress on my daughter.
You either love or hate purple, me I love it, used 
properly Purple really pops!


The chipboard here is painted with a metallic 
crackle medium over top of white gesso.


The Butterfly is painted with white gesso, and then 
inked gently around the edges. Then 
I have covered the surface with Dimensional magic
and a light sprinkle of white glitter to enhance 
the colour.
I have also added rhinestone flourishes to the background
and painted them white along with all of 
the other textures. I just love this 
technique and it uses up old rhinestone elements
that are horrible colours.


The background has texture paste applied over it and then
painted with white gesso before spraying with 
purple and green spray inks.


I have added touches of crackle medium to the background too.
This is highlighted when you add the sprays.

Again this layout has stood the test of time 
and I still use it in displays, it shows 
what a great textured background can do 
to set up the rest of the page.

By adding gesso to other elements on the page
it has a seamless look 

Happy Crafting 
From Sue Smyth 


Friday, February 10, 2017

flash back friday 3


Flash Back Friday  


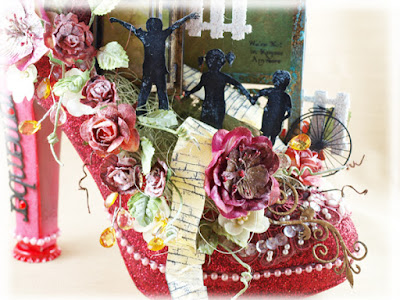
This is another of my favourite projects from 2013
I had learnt a lot from the previous shoe 
project and of course I had the other shoe left from the pair!


So I wanted to create a kind of Wizard of Oz 
theme for Imaginarium Designs. So I have 
started with a ruby slipper, painting the whole shoe
with dimensional magic and sprinkling over with fine
red glitter. It still looks glittery today.
I have painted a lot of the chipboard 
with Matt black spray paint
a technique I still use today.


The back also has to be tidy and interesting.
Here you can see my red bottle top on the 
heel. The reason for this 
was that the elements inside the shoe seemed to 
be on a lean, so I straightened them by 
popping the bottle cap on the heel...problem solved !!

Even the tall heel is a place to pop 
chipboard


The Chipboard children are painted black and 
covered with Dimensional magic to give 
a gloss look.
They have not faded over the years and still look fabulous 


To finish the look I have added a paper 
yellow brick road.
When you do a project well and 
use good products and techniques 
it will last the test of time.

Happy Crafting 
From Sue 


Wednesday, February 8, 2017

Couture Creations Guest post


Happiness Sampler 
or Golden Garden
By Sue Smyth 


Hi Bloggers
Here I am sharing a layout I did recently with the gorgeous
La Aquarelle range.
I really loved the subtle natural colours,
old world text and script.
But I wanted to contrast them with
shiny sparkling glitter.


The lacy open butterfly die is so versatile, here
I have embossed it twice with an aged gold emboss powder
it gives it an almost metal filigree look.


This panel is a sweet bird that I have fussy cut,
first I roughly cut out the bird 
and adhered it to white cardstock, so that 
I could flip it over on a mouse pad and 
cup the image. Then when you adhere
the bird with 3 d foam tape it has a great curved surface.


I loved the butterfly with fern panel, it did not need much
to decorate it, so I kept it simple, see how I did the fern fronds 
below. I covered the butterfly with dimensional magic
so the colour popped out more and it had shine and gloss.


I just love how the dies fit the images in the paper pad
perfectly, it will make, making cards and layouts
seamless and polished.
This butterfly could just as easily be placed on a 
card as a layout. I have added seed beads for detail 
to the centre.


To add more gold to the layout, I have flicked
a rich gold spray over the surface, along with 
a little watered down white and black gesso
for more of that shabby aged look of the text and script.


Each panel is edged with Anna Griffin gold glitter, 
just add a bead of glue or dimensional magic to the edge
smooth out with your fingertip and dip into a line of glitter.
I have then double matted each panel and adhered to 
the background paper with scraps of chipboard to
give them great dimension.


I have cut out fern fronds with the
beautiful fern die, then painted them with a 
green metallic paint. I have randomly
marked the edges with embossing medium and
covered with emboss powder, so just the tips of the 
ferns appear to be gilded.


The butterflies have been die cut from 
light weight chipoboard and then 
double embossed to give a metallic finish.


Each panel has glitter added to the edges, to contrast with 
the natural tones of the paper.

The end result is a lovely sampler that would 
make a great home decor piece in a frame. 
Or a wonderful gift to anyone who loves nature.


Artdeco Products Used 


Happy Crafting 

Sue Smyth 

Sunday, February 5, 2017

Bonus Post 

I recently made some pretty gesso brushes 
for a class and everybody loved 
them so much and they 
wanted to find out how I made them.
So I will share my secret shhhhh.


Let's face it we are girls and we like pretty things!
I love pretty things, and sometimes get
frustrated that we cannot find tools and storage
that looks nice too. 


So today I will share with you
a little thing I do to fix that !


I  basically decoupage my own mixed media tools
Here are some palette knives and big 
brushes, but you can basically do anything 


 I thought 
you all would like to know how to do this too.


Step 1
Trim out a piece of ordinary patterned wrapping paper
to fit the handle of your tool, and spritz with water.


Step 2
Apply gel medium to the handle and layer
over top the paper.


Step 3
Snip the edges of the paper around the 
handle 


Step 4
Apply more gel medium as 
needed so you can fold up the 
tabs on the side with a good firm bond.


Step 5
Fold over tabs,wrapping around the handle.
Dont worry if they over lap, just
apply gel medium to make the paper stick to each other


Step 6
When you come to the end, do your best, overlapping the 
awkward tabs and applying gel medium.
  

Step 7
Snip off excess for a smooth end.


Step 8
If you have a hole in the handle you can either
leave it covered if you like. Or 
you can insert a skewer into the hole
to remove the paper,and pop over
a large eyelet.


Step 9
Cover the entire handle with Dimensional magic, 
covering the eyelet too. Prop up on 
the edge of a jar to dry.


And as long as you dont immerse the handle in water 
for long periods of time they will last 
as long as you like


Happy Crafting 
Sue Smyth