Welcome to my Blog

Welcome everyone, I hope to inspire you and share some of my papercraft work. You can find out where I teach and what I am up to, what inspires me and what I am working on next. I love to share new ideas and neat ways of adding creativity to your pages or cards etc

my blog

Tuesday, May 24, 2016

Couture Creations 2


Your Time to Shine Layout 
By Sue Smyth 


Hi Bloggers
Today I wanted to share a layout that demonstrates
that Magnolia lane can suit stronger colours.
Often we tend to stick with the paler pastels in the range
but quite deliberately I included some accents of stronger colour.
Like the rosehips for instance, they help bring bolder 
colours, this time I have used a burgundy/ pomegranate as my
main  colour...
I hope you give it a go, following the step by steps below.


I love the tassels, I have wanted a tassel die for 
years, so I had to include them in Magnolia lane.
Here I show you how you can use them for just
about any colour tassel.


The paper magnolias take on the strong colour
readily, sprinkle with a little glitter and they highlight
the rose hip perfectly.


Add a little Distress ink to the ends of the leaves
for a simple detail that just make the leaves pop!.


A wonderful Imaginarium Designs phrase, is painted with 
matt black paint.


The resins are great the way the are, but add
a small amount of gold paint for a burnished 
look.


The tassels are cut from white cardstock and then
double embossed with gold embossing powder.
Then colour the insert, whatever colour 
you like and replace inside the tassel.
Use a little dimensional magic to hold the 
both together.


To start cut 3cm strips of patterned paper, distress edges
 score both sides at .5 cm and fold to form a channel.


Cut all of your elements and layer then on the page to 
see if they are going to fit and the 
composition works.


Tear a V in the white cardstock, and then
flick with red or pomegranate glimmer mist.
Make sure some of the flicks radiate
out from the centre. 


When you are happy with this, adhere white 
cardstock to Floral Fancy patterned paper.
and add the trimmed paper strips to the 
page. Butt them up against each other to 
form a kind of pin tuck effect.


Spray paper magnolia with water.


Then dip into a puddle of burgundy or pomegranate mist,
rotating the petals until they have 
grabbed enough ink.


This will colour the outside petals only and 
is called wicking.
Spray a small amount of spray adhesive onto 
each of them, and sprinkle with white glitter.


When dry, colour stamens with a yellow copic.


Die cut leaves with Rose cutting die, in pale green
cardstock, add green Distress ink to the ends of the 
leaves


Smear gold paint over the resin element.


To finish, assemble all of your elements .

Happy Crafting

Ultimate Craft products 

Magnolia Lane products


Saturday, May 21, 2016

Imaginarium blog post 1


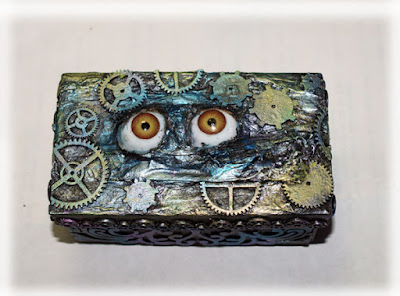
The Eyes Have it boxes,
and Metamorphosis Frame
by Sue Smyth 


Hi Bloggers
                                 One of the things I like to make most is little boxes,
 they are
great for storage, gifts and decoration.


This time I decided to make them a little spooky
so I can use them at Halloween too. But not 
too spooky so that I could have them on display all year.


They always look good in groups or pairs, so 
I have added this small tin box with a dragons eye trinket.
I have layered paper towel over the tin and adhered it 
in place with gel medium. Then simply decorated 
the box along the same lines as the tutorial below.


I have started with a purchased box and built
up a platform of tissue and gel medium
so I could insert 2  dolls eyes in to it.


Then I have added the small cogs around the sides and
adhered in place with gel medium


On the sides I have adhered plastic trim and chipboard.
Both of these are very light weight items so 
will not add to the weight of the box ..something to 
consider when making a project like this.


Paint all over with Black gesso, getting into the cracks and crevices. 


Rub over the entire box with Graphite Inka Gold when
the Black gesso is dry.


Then add layers of other colour, I have used
purple and turquoise, and even a little green.


Finally add gold paint over the raised areas
with your finger tip to give a brighter 
finish.


I have double embossed the bracket frame for the top
with Stampendous Aged Gold emboss powder.
Then added 2mm gemstones from Couture Creations.
This just nestles over the top of the eyes to frame
them and hide the rough edges.
Add metal feet and a keyhole trinket, also some pearls and rhinestones
as accents and you are done.

Imaginarium Chipboard 


Metamorphosis


My next project is a small deep sided frame. I have 
made a statement piece called Metamorphosis.
I wanted to illustrate that things change, people, times and ideas.
We often burst through our restraints and become free.

I have sprayed the frame with matt black spray paint 
and rubbed over inka gold metallic paints.


The chipboard girl has been sprayed black too, and I 
have used Mega Flakes and flitter glue to gild the 
shape. 


The cage over her is chicken wire which I have 
embossed with fine gold embossing powder.


I made a little wreath with small flowers and wired 
stems.


The back ground is simply chipboard covered 
in paper towel, adhered in place with gel medium.
I have roughly painted it with white gesso and added the ornate
corners.


Then smear the middle with texture paste and insert
chips of egg shell( this also adds to the metamorphosis theme)


When dry paint the egg shell with gesso and spray with 
inks, I have used green glimmer mist and chocolate 
dylusions on the corner.


Rub gold paint over the textured background to 
highlight the chipboard and egg shell.


Paint the butterflies with Matt black spray paint and rub
over with inka gold mediums of your choice.


Layer over each other 


Add girl shape and trinket. and place in the centre of the frame.
Then add trinkets above and below the butterfly 
and decorate with the wreath, small bird cage, and birds
nest trinkets as you like.

Imaginarium chipboard 


Happy Crafting