Welcome to my Blog

Welcome everyone, I hope to inspire you and share some of my papercraft work. You can find out where I teach and what I am up to, what inspires me and what I am working on next. I love to share new ideas and neat ways of adding creativity to your pages or cards etc

my blog

Sunday, September 28, 2014

Victorian Easel Card


Victorian Easel Card 
By Sue Smyth 


Hi Crafters 
Today I am sharing a card with you, it is an Easel card and has 
a Victorian theme. I have used a chipboard frame and altered it,
along with Toile Paradise paper and a paper doily.


This time I have fussy cut flowers from left over papers.
I have raised them up with 3 D foam tape.
Add some punched leaves to soften and you have yourself a
Victorian style Easel card

How To
To alter the chip frame, apply swirls and flourishes with 
liquid pearls and allow to dry.
Then paint with gold paint and dry with heat gun to 
blister and bubble the paint.
Rub over with a little gesso to age the frame and 
use as desired.

Materials 


Happy Crafting 


Monday, September 22, 2014

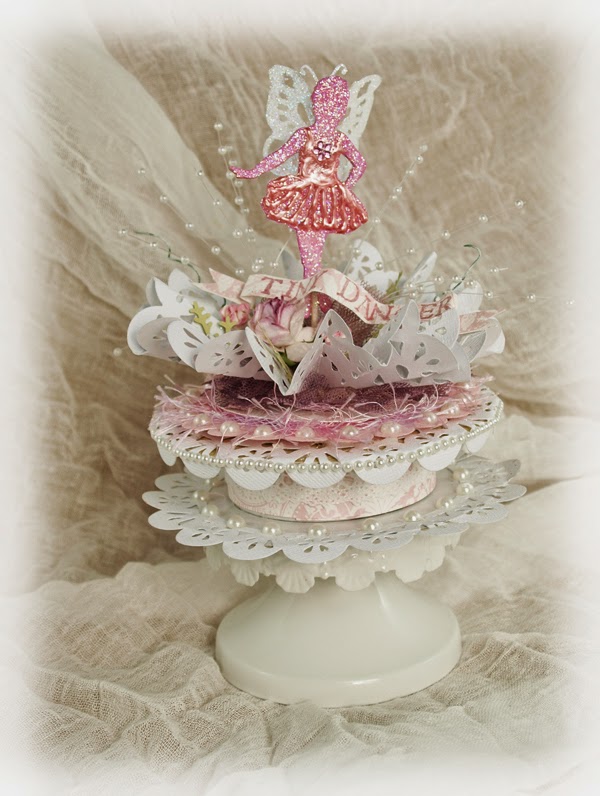
Tiny Dancer cake topper


Tiny Dancer Cake topper
By Sue Smyth 


Hello Crafters 
Today I am sharing a pretty paper confection that you could
use to top a cake, as a table centerpiece or just as a neat
3 D card for someone special


First decorate a flatish ribbon spool with 
ornamental doilies cut from white cardstock
layer over the top a scalloped circle and 
plan patterned paper circle.
Add pearls.


Die cut two pink ballerinas and one ballerina from
cereal box card. Clue the pink ballerinas to each side
of the cardboard one, apply Dimensional magic and white glitter to 
both sides. This may take a while to all the 
sides to dry.


Cut two ornamental lace doilies and fold in half and half again
then in half again, unfurl and cut a slit along one fold. 


Now fold each triangle in half again in a concertina fashion to 
form pleated look.


By now they should look like this, trim off one triangle from
each end and glue both together, with 
hot glue.


This will mean the doilies will form a cup like shape 


Adhere cupped doily to top of ribbon spool and attach ballerina to the middle.
I have inserted a toothpick into the feet of the 
ballerina for her to stand on.

TOP TIP
Paint the toothpick with gesso and sprinkle with white glitter


Now decorate
I have used pearls on strands of fishing line
paper flowers
fibres and gathered net
and adhesive pearls


I have made a scroll from cardstock 
with Tiny Dancer stamped on it.
You could put Happy Birthday or Get Well
Whatever you like.


Place onto of  a cake or a nice cake stand 


Couture Creations Materials 


Happy Crafting all 


Sunday, September 21, 2014

Imaginarium Sept post

Adore layout and Altered Book 
By Sue Smyth 


I was inspired by a layout I saw recently that used lots of chipboard doors
over a layout. I though I could do the same with frames.
Often the repetition of the same shape or concept 
can look very pleasing on a layout.


I have embossed all of the frames to give them something in common.
Though some I have crackled and aged some for a slight variety.


Some frames do not have a photo in them 
just a resin shape.


Because the frames are so ornate, you can keep the journaling 
and title simple and plain.


Adhere some of the frames to the layout flat and 
others with 3 D tape for a interesting play 
with layers.


A mini Tutorial on the gold crackle frames


Step 1
Spray the frames with Matt black spray paint 


Step 2
Apply embossing medium with a crackle stamp.
I have a crackle roller .


 Step 3 
Sprinkle with gold embossing powder.


Step 4 
Shake off excess 


Step 5 
Heat emboss 

Imaginarium Chipboard 


Altered Book 


Old books are easily sourced as a base to start a project on.
I have used an old Reader's Digest here.
Which cost just $1.00


Do make sure it has a sturdy and unbroken
cover to start with. 


Open out to the middle, and this may 
take a little time, adhere every page together 
on each side with gel medium or PVA glue
.

Handy Hint
Tear out every 3rd page or so, to reduce the volume
and the amount of pages you will have to glue.


When dry, use a scalpel to cut out the centre, to form 
a recess for the photos.

I have used embossing powders to alter the chipboard
children, in the same colours as the rest of the project, and painted
the butterflies with Metallic blue paint.

The top flourish, is painted with white gesso, several coats
give a better look. Then I have stamped randomly over
it with a sepia ink. Ink around the edges
in a sand colour for a soft gentle look.


The thistles and wildflowers have been painted with gesso. Then I have
added micro beads over certain areas, with Dimensional magic.
When dry, paint with gesso again and spray with Olive 
glimmer mist. Rub over a little metallic blue paint where
the beads are for greater detail.
I have used a white paint pen to add even more detail to the 
thistle and leaves.


Imaginarium Materials


Happy Crafting