
2 Layouts and a Mini Journal
by Sue Smyth

Well we are off for another year of fun and creativity at
Imaginarium designs
And of course I do a clean out of my studio at the beginning of
each year,and I found an old unfinished layout.
It had playing cards on it and a few photos of
my son adhered to the back of cards.
I liked the photos, so I decided to use them on a fresh
layout( I peeled them of the other one )
I came up with a layout that proves you can use
hearts and flowers on a boy page!

Here the Imaginarium chip heart is painted first with white gesso
then red paint, then apply dimensional magic and
sprinkle liberally with fine red glitter for a smooth
glitter paper look.
I have added 3mm gold pearls to frame the shape and
a small funky heart that has been simply sprayed
with matt black spray paint.

The Photo frame is embossed with aged gold embossing powder
but only once so the aged effect can show up at its best.

The same powder has been used for the corner,
but this time I have embossed twice, you can see
the difference here.

The rest of the chipboard is sprayed with
matt black spray paint, to highlight the edges
simply sponge or paint with
a little metallic gold paint.

The playing cards have been adhered directly to the cardstock,
then it is painted with gesso and sprayed, but I avoided
covering the images completely, I wanted some of
it to show through.
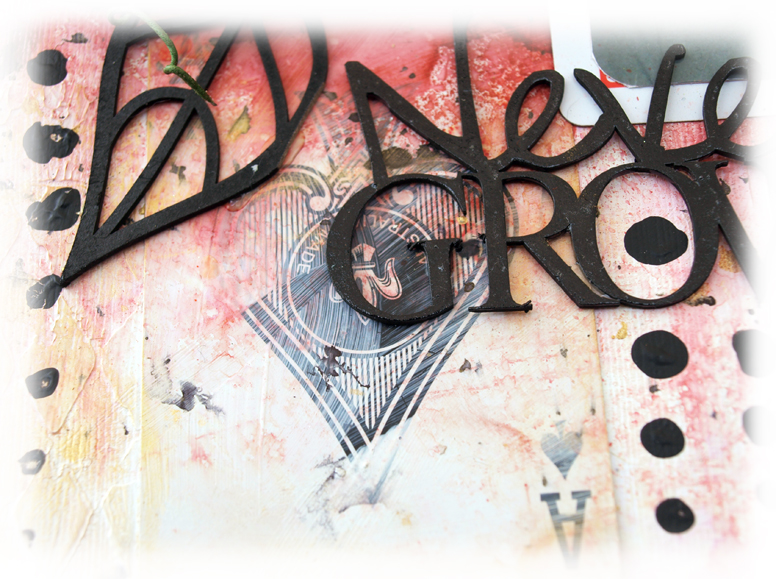
I left some of the Ace showing as well.

This is how the base of the page looked, before I rubbed
gold paint over the raised areas and added black accents.
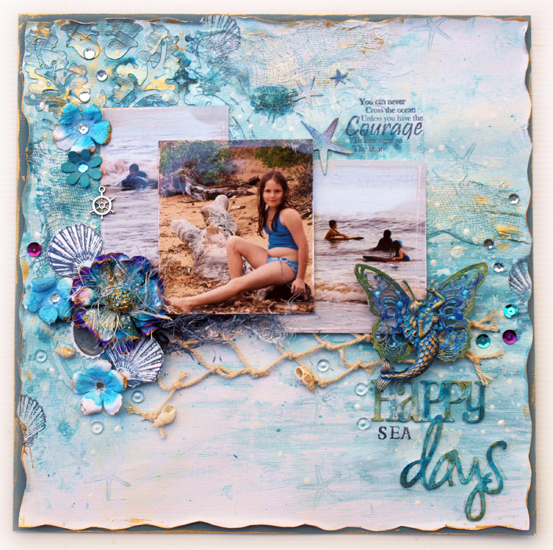
Next is a mermaid/ sea layout, I was playing with Dylusions and
a fan brush and just loved the sinuous movement of the ink.
It begged to be made into a sea page.

Here I have altered a flower to look like an anemone
with lots of ink and spray, I have painted gold paint onto
the edges for a gilded look.

Here is my happy mermaid, but she was not very large
so I made her appear bigger by adding wings with
ID chipboard butterfly, altered and coloured to match

My Happy Days chip is simply painted with
White gesso and then I have dabbed
dylusions over to with a fan brush. Each time
I have dipped the brush in water, so I have a
variety of tones on the surface.
Then I have dry brushed gold paint over top
for a metallic sheen.

I have added some stamped images and die cut
starfish to complement the theme.

Lots of lovely layering.

Next is an artists journal, this is only a small A5 book so
does not have a lot of room to decorate.
and I wanted it to be useful so have gone for a simpler look.

After I have altered the surface I glued the chipboard frame
directly to the front along with the letters ART.
And even the pearls are adhered down at this stage
to form a base of texture rather than shine.

Then I have painted the entire book with black gesso,
then a coat of teal dylusions paint.
To finish add spots of colour with Inka Gold
paints, using the colours of your choice.

Finish with a layer of gold metallic paint or inka gold
to highlight all of the texture.
This will accent the frame and the letters
as if they are almost embossed
without the fuss of embossing.
Then just decorate with Imaginarium trinkets and in this
case a resin frame.
Happy Crafting
From Sue Smyth


.JPG)

Loving those layouts. Looks like so much fun creating these.
ReplyDelete