Welcome to my Blog

Welcome everyone, I hope to inspire you and share some of my papercraft work. You can find out where I teach and what I am up to, what inspires me and what I am working on next. I love to share new ideas and neat ways of adding creativity to your pages or cards etc

my blog

Sunday, January 24, 2016

papercraft book


3D Paper Craft Projects
By Sue Smyth


I can finally share with you all a project I was working 
on a good part of last year.
This was a labour of love, all the projects, 39
of them, have been created by me.
The book includes full colour photos, taken by me
and instruction and templates.

There is a sweet project for every occasion, many
of which I have taught and made over the years.
I share my tips and tricks to make creating them
so much fun and easy too.


You can pre order it, online.
Release date is April 5.

Thursday, January 21, 2016

Imaginarium post


Doll face canvas & Bonus post
by Sue Smyth 


Hi Bloggers
you all know I love a canvas, so to kick start 
my creativity this year I started with an 
idea I have had for a long time.


I wanted tor recycle a doll by taking just 
the plastic face and trimming it.


I have added lace and buttons to the background for texture 


For wings I have used Imaginarium metal wings,over top
of the large chipboard butterfly.


To make the heart shaped embellishment check out
my step by step below

For the bottom element I have used a wooden spoon, layered
over with a silver spoon, add some micro beads and 
a resin relic face and you have 
an interesting embellishment


I like to gather my elements together 


Buttons, trinkets and laces so I know
what I want to use and dont 
forget to include them as I work.


And I have been collecting Dolls faces
they look a little spooky here
I know, but it saves keeping 
the whole thing in limited space


I have covered the canvas in old book pages first, 
for a great background. Then arrange 
your elements, so you have an idea
what you will end up with.


For the gold wings, even though they are 
metal, I have embossed them with
aged gold embossing powder for 
super extra shine.


To make ombre butterflies
First paint them black with 
matt black spray paint, and dry.
Then cover with dimensional magic, along
the outer edge only, sprinkle with 
the darkest colour glitter, then add more 
dimensional magic and sprinkle with
the next colour, and finally
apply dimensional magic to the inner
edge and add the lightest coloured glitter.
The over all effect is a graduated ombre look.
A great way to alter chipboard for any project 


Preparing the canvas. 
After it has 
been painted with white gesso
spray with Red dylusions, but 
mop off some of it with a wet wipe 
so the book pages show through.


I like to paint the sides of my canvases with black gessso
this hides any mistakes and problems.
It also frames the canvas, as black recedes from
our sight, and does not jump out at us.
So we then do not notice the sides so much.


Rub over with gold and wipe back with 
a wet wipe to show the print on the book pages


Re add any gold paint you feel needs to be replaced.


To make the heart embellishment


Step 1
Gold emboss a chipboard shape, large
chunky ones suit better.


Step 2 
While hot, spray with Red dylusions and keep
heating for about 5 seconds.


Step 3
Add 3mm gold pearls around the edge
using extra glue so that they stick well.
You can cover the heart with a coat of 
dimensional magic too if you like,
but in this case I have not


The finished trinket is added to the canvas
and I have adhered a small 
resin rose to the centre.


Bonus Post 


Let's face it we are girls and we like pretty things!
I love pretty things, and sometimes get
frustrated that we cannot find tools and storage
that looks nice too. 


So today I will share with you
a little thing I do to fix that !


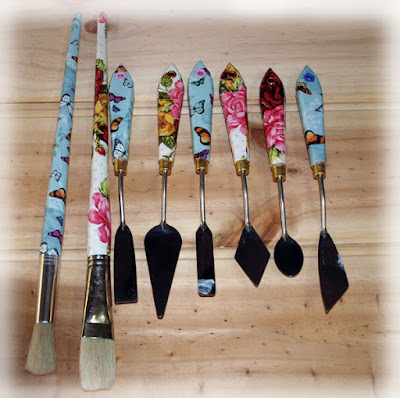
I  basically decoupage my own mixed media tools
Here are some palette knives and big 
brushes, but you can basically do anything 


You might think this has nothing to do with chipboard and 
you would be right, BUT I do use these beauties to
alter my chipboard lol. And I thought 
you all would like to know how to do this too.


Step 1
Trim out a piece of ordinary patterned wrapping paper
to fit the handle of your tool, and spritz with water.


Step 2
Apply gel medium to the handle and layer
over top the paper.


Step 3
Snip the edges of the paper around the 
handle 


Step 4
Apply more gel medium as 
needed so you can fold up the 
tabs on the side with a good firm bond.


Step 5
Fold over tabs,wrapping around the handle.
Dont worry if they over lap, just
apply gel medium to make the paper stick to each other


Step 6
When you come to the end, do your best, overlapping the 
awkward tabs and applying gel medium.
  

Step 7
Snip off excess for a smooth end.


Step 8
If you have a hole in the handle you can either
leave it covered if you like. Or 
you can insert a skewer into the hole
to remove the paper,and pop over
a large eyelet.


Step 9
Cover the entire handle with Dimensional magic, 
covering the eyelet too. Prop up on 
the edge of a jar to dry.


Imaginarium Chipboard 


Happy Crafting all!


Couture Creations Magnolia Lane tri fold card


Magnolia Lane Tri Fold Card
By Sue Smyth 


Hi Bloggers
Well you should all be seeing Magnolia Lane in the flesh
at your local store by now, or at least it will 
be on its way very soon.

As its designer, I cannot say how delighted I am that one,
it is finally out there, and two that 
you are all embracing it so well.
I would like to think my years of teaching and 
crafting has headed me in the right direction
and brought you all a collection full of versatility, 
beauty,, gorgeousness and above all practicality. 

Today I am sharing a tri fold card I made for CHA
with Magnolia Lane. 


Start with an A4 sheet of cream cardstock, if you want
just cut down a 12 x 12 to 30 x 21 cms and that will be close enough.

Score every 10 cms then cut a diagonal line from the first score
across to the bottom corner, as pictured.
Then fold up to form a card.


Decorate the inside with Magnolia Lane Pretty Patches
Trim Magnolia Lane Borders to decorate the front 2 panels.


Cut a medium sized oval, smear the edges
with Dimensional Magic and dip into 
white glitter.


I store my glitter in a large open pot so I
can dip even large shapes into it with ease.


Then die cut some patterned paper
( this is not the same as in the card and is a sample)
cover with Dimensional magic 
and sprinkle with a tiny amount of white glitter.
then adhere to white scalloped oval
with 3 d foam tape. 
Place this on the front of the card to finish.


Add a strip of Magnolia Lane lace, pink rhinestones and 
3mm pearls along with a generous white bow.
I have also added a panel from Magnolia Lane Poetic Label paper inside.

Happy Crafting all

Materials 
ULT157498 Magnolia Lane Pretty Patches 
ULT157490 Magnolia Lane Magnolia Borders
ULT157497 Magnolia Lane Poetical Labels 
ULT157506 White Lace 
C0724633Couture Creations 3 mm snow white pearls 
C0721994 Couture Creations Classic Gemstones Pink Diva 


Tuesday, January 19, 2016

sneak peeks of Magnolia Lane

Sneak Peeks of 
Magnolia Lane Classes
by Sue Smyth 


This is the first project .
..Magnolia Lane Butterfly Explosion box 
Explosion boxes always are a lovely surprise and a great gift to make and the Magnolia lane Buttterfly box is no exception. Created for you by Sue Smyth the designer of Magnolia lane, this explosion box will delight you while learning how to make sugared magnolias, elegant tassels and altered leaves. Incorporated in the box are the Magnolia lane resin frames, Rosettes and of course several dies. The kit will include everything you will need to make your very own


Sweet surprise 


Learn how to make this glittered Butterfly 


Second project 


Indulge a pretty mixed media project, and make an adorable work of art, or the perfect gift. This sweet triptych is uses the Magnolia Lane range created by Sue Smyth. You will play with mediums, paint and glitter to make a sugared magnolia, ribbon lacing and textured frames. This project is adaptable and easily convertible to 2, 3 or 1 photos, and takes up very little room to display.  


3rd Project 


This gorgeous sampler designed by Sue Smyth the creator of Magnolia lane, shows you the versatility and beauty of the range. We use the matching dies to create fabulous embellishments, like sugared magnolias, along with the Trinkets, cabochons and Cameos. You will love making each panel as its own work of Art, if you prefer to add a few photos, simply take out any panels you like and convert them to cards. In fact if you are a cardmaker, add all of the panels to card blanks to create 12 handmade cards.


4th Project 


And the last project is a sweet soft layout you will cherish.
Soft magnolias combine with delicate lace and pastel pink to create a layered feast for the eyes. This is definitely a layout for the girls, heritage or vintage photos will also sit nicely into the page. Learn how to make decorative tassels, hombre chipboard titles and decorated bird cage. Team this layout with the Vintage Sampler for a wonderful double paged spread.  


Happy Crafting 


cheers Sue