Welcome to my Blog

Welcome everyone, I hope to inspire you and share some of my papercraft work. You can find out where I teach and what I am up to, what inspires me and what I am working on next. I love to share new ideas and neat ways of adding creativity to your pages or cards etc

my blog

Thursday, December 21, 2017

Christmas Cheer for Imaginarium


Altered Pringle Tins and Bauble 
By Sue Smyth 


I love to recycle, and pringle tins are one of  the best 
and most rewarding things to  decorate.
 I wanted to do 
a Christmas theme but not so much that I could not 
use this throughout the year.


I was after an ornate look, as if it might be an artifact 
or piece from a royal palace, so  I knew gold would be in the mix lol.


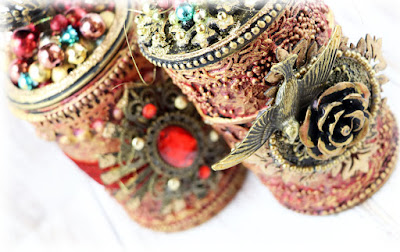
I simply adore how the antique beads came up. I have 
used cheap gold and coloured beads and rolled
them in a dish of Alcohol ink
Here I have used Mushroom and Cranberry to give 
them an aged look. They remind me of  mercury glass I think.
I have also used a cheap plastic snowflake decoration
as the base for the tree tin.


I have decorated the front with ID frames and sunbursts
then set a jewel or resin rose
in the centre, I just could not resist
adding a sweet bird trinket too.


This is a pringle tin, and I have used 
a fibre bristle tree on top, but I have sprayed it 
red with Dylusions post box red.
Then I have brushed Dimensional magic (or glue)
over the bristles and rolled it in gold 
glitter!!! It looks superb in real life.


This tin is a Chai tea tin ( I have sprayed the inside with 
black spray paint to disguise any marks left inside)
The finial on tip is an old Christmas tree topper.
I have sprayed it with matt black spray paint
and rubbed over with Alchemy gold 
wax.

Check out how I achieved the texture on the surface 
on my mini tutorial below 


Antique Bauble 


My next project uses much the same techniques as above but 
with a few twists.


This gorgeous bauble uses ID border chipboard 
and two doiley chipboard shapes.


I wanted it to look good no matter what angle you
looked at it.


Then I have layered a large filigree trinket with a sunburst
Chipboard. then a ruby gem.
Around the edge I have added dimensional magic 
and some beautiful red micro beads, I have 
used a pointed tool to mooch them into 
shape. I also love the mirror glass shards
that I randomly adhered to the spikes of the 
chipboard.


I started with just an ordinary foam bauble from
Kmart...costing 2.00 


I snipped out the centre of the doily so it would 
fit over the bauble top.


Then with texture paste (as this has more grabbing power on round 
objects) I have glued the chipboard onto the bauble.
The tip is to spray the chipboard with a little water
first, then it will mold nicely to the shape.
Then add rubber bands to hold in place while it dries.


Once texture paste is dry, paint with black gesso.


Then paint with orange Dylusions paint, leaving 
little bits of black showing.


Then I have rubbed over Inka Gold, in Copper, and Red.


Then I added a little Metallic Red and Gold Alchemy wax 
because I liked the colours.
Over top of that add more gold paint rubbing over the 
raised areas and decorate as above to finish.

Altered Tins Tutorial 


These are the humble containers I started with.


Add a generous amount of texture paste.


Then add some trim to the top and bottom and stipple 
the texture paste, then I have used 
glass beads. just at the top and bottom not the middle.


Spray the border chipboard with a little water and
wrap around the tin, add a rubber band to hold in place.


I have done the same for the second tin.


When Texture paste is dry, paint them black with gesso.


Then paint over with orange dylusions paint. I have used
orange because it is close to gold in colour and 
I wanted an over all gold humm.
Then rub over with Red, copper and gold inka gold
to finish and decorate the front and lids as you like.


Happy Crafting 
and a Very Merry Christmas to you all
thank you for following my crafty projects throughout 
the year and I hope I inspired you all 


Sue Smyth 


Tuesday, November 21, 2017

imaginarium fairy business


Fairy Business 
By Sue Smyth 


Recently I went to an visual installation that featured
fairies, dragons and elves, it was gorgeous.
It so inspired me to do a woodland
fairy canvas  


First I started with crumpled tissue paper, which I painted 
black, then I added wood fibre, also painted black


Then I painted the canvas moss green and dried
it off . And then added
inka Gold and metallic paints.


Next I altered a plastic doll to look like
a woodland fairy.
The wings are a large butterfly which
has had moss added to it.
I have added a skirt in sheet moss 

Cloisonne Butterfly technique 


This is one of my favourite techniques (please forgive the blurry
shot here lol)
Cover a chip butterfly with 
Purple liquid pearls, use 
a toothpick to move it out to the edges nicely.


Then add dots of gold liquid pearls.


Then use a toothpick to swirl the 
gold around the purple while it is 
still wet. Dont over do, 
then allow to dry. 


Then I have arranged my canvas, added
vines, tiny mushrooms, pine cones and flowers.

Here are some close ups to show the details


A little Christmas Cheer 


With the silly season almost here, my thoughts 
turn to decorating. 
This was a purchased book box that 
I thought would be lovely if decorated in side.


So I added some background paper then the 
ID window, which is covered with my 
faux snow..see below for recipe


It gives a wonderful textured look to the window


Then some green moss looks like 
foliage, especially when I have
dabbed it with a little white gesso to 
create a snowed look.


I have tucked some Tim Holtz deer in side the window too and 
of course some ID chipboard trees, also 
covered in the faux snow.

Faux Snow 

It is really difficult I know lol

1 teaspoon of white gesso
1 teaspoon of white glitter 
mix together until happy, add more glitter for more
texture.

You can use fine glitter (which I have) or 
chunky glitter for a more textured look.

Happy Crafting 


Saturday, October 21, 2017

October spookiness


October Spookiness 
By Sue Smyth 


I love decorating, whether it is for Halloween or Christmas 
so each year I make a spooky book to 
use in a Halloween display.
I have been experimenting with lashed binding
on the spine and wanted to incorporate it in this project.


This year I wanted to do Dracula's Diary and I had the
idea in my head for most of the year.


I wanted to use fangs and bats and trinkets along 
with a neat key or two.


Here I have embossed one of the chipboard swords with
Stampendous aged silver embossing powder, it is 
great for covering chipboard and is even better when 
done twice.


The fangs were painted black, then cut in half.
then rubbed over with gold paint, 
I have stuffed the top of them
with shredded muslin.


I have painted the trinket with black gesso, let sit
for a minute or two then wipe 90 percent of
it off with a baby wipe for a better
antiqued look.


My boys love dragons, and I found in Kmart
some plastic dragons and a mini castle play set(see below)
and thought this would make a great 3 D top for a box.


I love the texture of the castle, once you
paint it with black gesso and add colour over the top
the texture is enhanced.


I love the vibrant dragons eye, quite by
accident I put lots of black seed beads
around and they kinda covered the edges
like the eyelids of a dragon.


The head I cut off the toy and glued onto the
top of the castle.
I wrapped black fibre around the base and
pushed into the glue to add strength.


That lovely Dragon eye.


The wing I wanted to have a red tinge to it
so I have added red inka gold over the top of the blue and 
purple inka gold.


This is toy set I used...so cool

The base was a box from Couture Creations Seasons Greeting
set 


Add you layer of texture using chipboard and 
adhering it down with gel medium.


After adding a layer of texture paste with a stencil
that resembles scales, I added the Emma frame
but cut it up to fit.


Once you have all of your texture on,
paint with black gesso, I think
this is kind of nice even with out the 
next layer of paint.


Now dry brush with after midnight Dylusions paint. 
This gives the box a bright blue hum under the 
final layers.
Then dry brush cobalt inka gold over top with a fan
brush.
Then add spots of purple and green as desired.
Finish with a final layer of Art Alchemy Metallique gold wax.


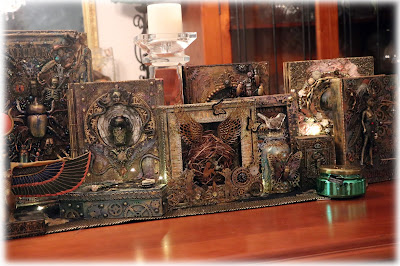
I have included a few photos of my altered book display for 
Halloween.
This is why I do so many, they look cool on display dont you think?


Happy Crafting 
From Sue