
Well of Wishes
By Sue Smyth

Today I am sharing a cute little wishing well, made from an old
pringle tin. I could see this used for a Wedding or Baby shower,
fill the middle with
sweets, well wishes or even money or scratchies.
Everyone can pop one in as they arrive.

I have added a tinsy bird to overlook the well and
you will notice tiny toadstools at the bottom/

The sides are decorated with the Vintage Branch die and
purchased flowers, I have used a
dry brush and darker pink ink to highlight
the centre of the roses.
The larger rose is dipped in white glitter
for a sugared rose effect.

On the other side there is a cute bunny resting
under the rose bushes .

Add some brad butterflies to the rose bushes,but make
sure they are as close to scale as possible
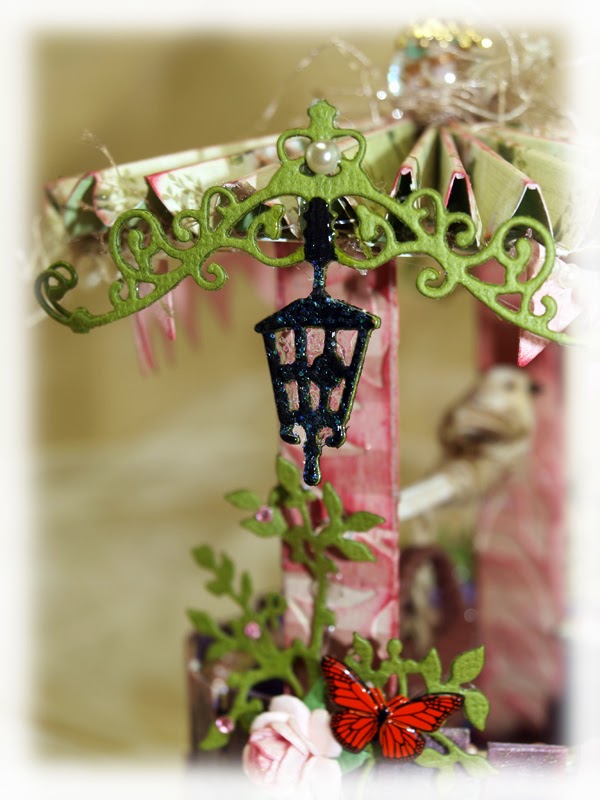
I have trimmed the banner off the Garden Lamp die.
Cut 2 of the Garden lamp and snip off the bottom section, glue both together.
Leave the ends unglued to add to the vine look.
Colour the lamp section in with black pen.
Cover with Dimensional magic and sprinkle with a little glitter
If you are really clever the Dimensional magic will
fill in the panes, and look so much like glass!

Another little butterfly

Cut 2 banners, ink edges and apply tiny pearls
in a row across the top.
I have cut out a scalloped circle, for the base and adhered that
to the plastic top of the pringle tin to raise it up
a little.

Step 1
Cut pringle tin down to the appropriate size, I have
used a hacksaw. then paint with gesso.

Step 2
Trim sturdy chipboard into 2 cm pieces to resemble bricks.

Step 3
Adhere the chipboard tiles around the edges with a good
gel glue or hot glue gun.
Bend the tiles a little to make them fit the tin better.

Step 4
When dry paint with gesso and spray with
a brown spray ink to colour.

Step 5
Cut 2 Strips of Vintage Rose Garden paper.
Scallop edge with a punch if desired.
Score at each 1 cm and fold up concertina style.

Step 6
Adhere both strips together and at each end to
form a circle, then create a
rosette.

Step 7
Cut 2 lengths of chipboard, about 1.5 cm
Trim patterned paper to cover both and adhere to both sides
ink edges and emboss with any embossing folder
for texture.

Step 8
The basic components altered pringle tin with
chipboard bricks.
Rosette roof and side beams for roof.

Step 9
Adhere side beams to side of tin. Add another
beam across the top for the rosette roof to
attach to.
I have also die cut a circle of patterned paper
to adhere over the rim of
the tin to hide the edge.

Step 10
Attach two chipboard pieces to the under side of
rosette for strength.
Attach fibres around the edges and add hat pin

Step 11
Cover underside of the roof with a scalloped circle in
white cardstock. Affix to top beam of well and
decorate as desired, following my suggestions above.
Couture Creations Materials
Happy Crafting all


No comments:
Post a Comment